This utility is a plug-in (studioImport.mll). You can use this node in situations where certain materials, such as car paint, reflect light differently depending on the relationship between the viewing direction and surface orientation.
Find this utility in the Create Bar (see Hide, resize or customize the Create bar).
To use this utility, see Use the Studio Clear Coat utility.
studioClearCoat is a separate node. In Maya, complex shading networks can be built with many smaller nodes, but because studioClearCoat is its own node, it can be applied to any material (even plug-in materials). You plug the output of the studioClearCoat node into the Reflectivity of the material.
You can use IPR to tune studioClearCoat attributes. This is especially powerful when you apply the output of the studioClearCoat node into the color of a Surface Shader node.
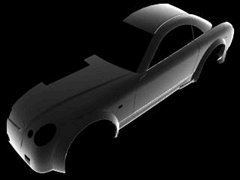
In the following, white shows maximum reflectivity and black shows minimum reflectivity.

When satisfied with the studioClearCoat settings, you can plug the output back into the material’s Reflectivity attribute and be confident of the result.
The next image was produced using the studioClearCoat plug-in. Notice how the hood and top of the car are more reflective than the front and sides of the car.

As well as the generic Caching and Node State operations, studioClearCoat contains the following attributes:
Controls the middle point of the contrast adjustment and is added to the final result. Increase Bias to move the middle point upwards (more of the texture becomes dark as contrast increases). Decrease Bias to move the middle point down (more of the texture becomes light as contrast increases).
final result= f(index of refraction) * scale + bias
Where f(index of refraction) is the studioClearCoat computation with the index of refraction as input.