To select a renderer to see the Maya Vector tab, see Select a renderer. Render Settings that apply to all renderers are in the Render Settings: Common tab.
For information on the render settings, see Maya Vector renderer.
The version of the rendered Flash Player file: Flash 3, Flash 4, or Flash 5. The rendered Flash Player file plays back in any version of the Flash Player (and import into any version of the Flash authoring application) that is equal to or greater than the Flash Version.
When Flash Version is Flash 4, and Fill Style is Area Gradient or Mesh Gradient, the rendered animation contains a dummy frame at its beginning. (This is to compensate for a limitation in the Flash 4 authoring application.) After importing your animation into the Flash 4 authoring application, delete this extra frame.
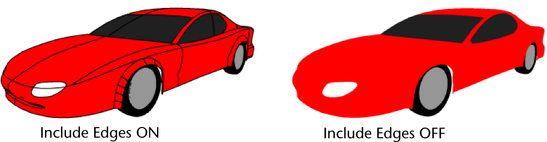
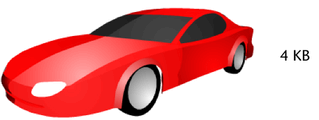
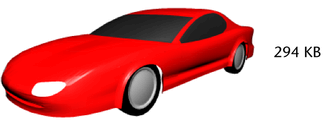
When Combine Fills and Edges is on, outlines and fills for a surface are a single object. If you import the file into the Flash authoring application, you cannot separate the outlines and fills unless you break apart the object. However, the size of the rendered file is smaller than when Combine Fills and Edges is off.
When Combine Fills and Edges is off, outlines and fills for a surface are separate objects. If you import the file into the Flash authoring application, you can separate the outlines and fills without breaking apart the object. However, the size of the rendered file is larger than when Combine Fills and Edges is on.
If Svg Animation is Native, Maya creates one SVG file containing the frames of your animation and the scripting that drives it.
If Svg Animation is HTML Script, Maya creates an SVG file containing the frames of your animation and an HTML file containing the JavaScript that drives it.
If your animation is long (approximately 40 frames or more), file size increases when Svg Animation is Native.
A value from 0 to 15 that determines how object outlines are represented with either curved lines or a series of straight line segments.
When Curve Tolerance is 0, object outlines are represented by a series of straight line segments (one segment for each polygon edge). This produces an outline that exactly matches the outline of polygons, but also produces larger file sizes.
When Curve Tolerance is 15, object outlines are represented by curved lines. This produces an outline that may appear slightly distorted compared to the original object’s outline, but also produces smaller file sizes.
You may need to adjust the Curve Tolerance setting on a scene by scene basis to produce the best compromise between outline accuracy and file size. Begin by setting Curve Tolerance to 7.5 (the default). If the rendered file size is too large, try increasing Curve Tolerance. If object outlines appear distorted, or the animation appears jumpy where there are curved outlines, try decreasing Curve Tolerance.
Determines the level of detail in the rendered image. A High Detail Level (30) produces a more detailed image and a more accurate render than a Low Detail Level (10), but takes longer to render and increases file size. (When the Detail Level is Low, small polygons are combined with adjacent polygons.)
You may need to adjust the Detail Level on a scene by scene basis to produce the best compromise between image quality and file size. Begin by setting Detail Level to Low, and increase it as necessary to produce acceptable image quality.
Set Detail Level to Automatic to allow Maya to choose the appropriate level of detail for your scene.
Set Detail Level to Custom and use the numeric field or slider to set the Detail Level to any value between 1 and 50. (Setting Detail Level to 0 is the same as choosing the Automatic preset.)
The style of shading used to fill surfaces in the rendered image.
For all fill styles (except Single Color) the fill color is based on surface material color and lighting from point lights only; all other types of lights are ignored. If your scene does not contain point lights, a default point light (located at the camera) is automatically created during rendering (and removed after rendering).
Fills each surface with one solid color based on the surface material color.

Single Color can produce nice cartoon-like results, especially when your model is composed of separate surfaces that each have a different colored material.
The Single Color fill color is actually based on the surface material color and an ambient light (located at the camera) that is automatically created during rendering (and removed after rendering). Therefore, the fill color may not exactly match the surface material color. The fill color should not change during an animation.
Fills each polygon on a surface with one solid color based on the surface material color and on scene lighting.

Full Color produces realistic 3D results, but also produces very large file sizes. (The greater the number of polygons in your model, the greater the file size.)
Fills each surface with one solid color based on the surface material color and on scene lighting.
For smooth, organic objects that have few surfaces defined by hard edges, Average Color does not usually produce results that are any better than Single Color.
Fills each surface with one radial gradient based on the surface material color and on scene lighting.
Area Gradient can produce nice 3D effects with a small increase in file size.
Fills each polygon on a surface with a linear gradient based on the surface material color and on scene lighting.
Mesh Gradient produces very realistic 3D results, but also produces very large file sizes. (The greater the number of polygons in your model, the greater the file size.)
Mesh Gradient is the highest quality fill style available when rendering to SWF and SVG formats.
Surfaces with normals facing away from the camera are rendered as if they were facing the camera. When Show Back Faces is off, surfaces with normals facing away from the camera are not rendered.
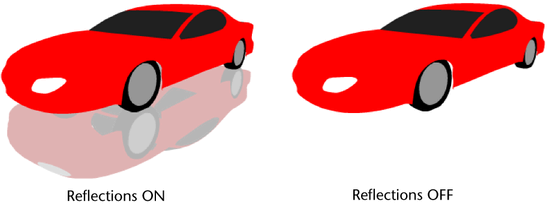
Object shadows are rendered (based only on shadow-casting point lights in your scene). Shadows can greatly enhance the 3D effect. However, shadows also increase file size and significantly increase render time.
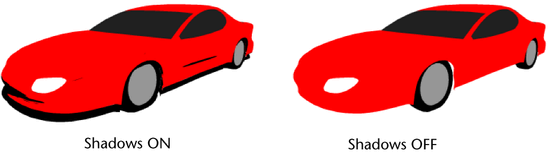
When Shadows is turned on, shadows are rendered for all objects. You cannot render shadows only on certain objects (for example, by turning off Casts Shadows or Receive Shadows for an object).
Shadows are only rendered if there is a shadow-casting point light in your scene (that is, a point light that has Use Depth Map Shadows or Use Ray Trace Shadows turned on).
Specular highlights are rendered (based only on point lights in your scene and on surface material shininess). (When Fill Style is Single Color, specular highlights are based on the position of point lights in your scene. Changing the intensity or color of point lights does not change the appearance of highlights.)

Regions of surfaces that are close to being perpendicular to a point light are filled with a number of concentric solid color regions (based on surface material Specular Color and on the Highlight Level value) that are lighter than the rest of the surface.
| For this material... | Surface shininess is based only on... |
|---|---|
| Anisotropic | Roughness |
| Blinn | Eccentricity |
| Phong | Cosine Power |
| Phong E | Roughness |
When Edge Style is Outlines, surface edges and silhouettes are rendered as outlines. (Use Detail Edges to also render sharp polygon edges as outlines.)

When Edge Style is Entire Mesh, all polygon edges are rendered as outlines. Entire Mesh produces very large file sizes. (The greater the number of polygons in your model, the greater the file size.)
When you turn this attribute on, an outline appears along the point where two objects intersect. Use the Edge Priority setting to resolve edge outline conflicts (when depth does not automatically do so). This attribute is also located in the Vector Renderer Control section of a material's Attribute Editor.
Determines which polygon edges are rendered as outlines when Edge Detail is on. Min Edge Angle is the minimum angle (measured in degrees) that two adjacent polygons’ normals must have in order for their common edge to be rendered as an outline.
Decreasing the Min Edge Angle produces larger file sizes because of the extra vector information in the rendered file.
The Render Optimization setting specifies how the Vector renderer optimizes the current frame to reduce file sizes. You can select one of the following types of optimizations: