To set the of your nCloth
- In the scene view, select the nCloth for which you want to set its Initial State.
- Playback your nCloth until it reaches the shape you want to set as its Initial State and then stop playback.
- In the menu set, select .
This sets which shape your nCloth starts its simulation with. For example, you can set your nCloth’s so that it appears to be draped over a couch at the beginning of its simulation.
Note
- Setting the of your cloth sets its shape at the start frame. It does not affect the input mesh or rest position.
- You can set the attribute in the section of the nClothShape node to increase or decrease how much your nCloth wants to retain the shape of its input mesh.
To shatter an nCloth
See Creating a Tearable Surface constraint.
To inflate or deflate an nCloth object
- Select the nCloth object you want to inflate or deflate.
- In the , select the nClothShape tab.
- Expand the section.
- Do one of the following for your nCloth:
- For the , keyframe the attribute so that its value increases (inflation) or decreases (deflation).
- For the , set a and then keyframe the and . If your object has any holes in its surface, you can also keyframe its attribute for fast inflation or deflation.
Dent, crush, or warp an nCloth beyond its restitution limits
The following procedure details how you can make an nCloth retain its deformed shape. For example, you can create a crushed
cardboard box or a dented metal trash can.
To dent, crush, or warp an nCloth beyond its restitution limits
- Select the nCloth object for that you want to dent, crush, or warp and have it retain its mangled state.
- In the , select the nClothShape tab.
- In the section, set the following for the nCloth:
- determines how far (in degrees) the selected nCloth object can bend across an edge before it can no longer go back to its
rest angle. You can combine with to simulate deforming metals.
- determines how far the links in the selected nCloth object can stretch before they can no longer return to their rest lengths.
You can use to simulate a substance like silly putty being stretched.
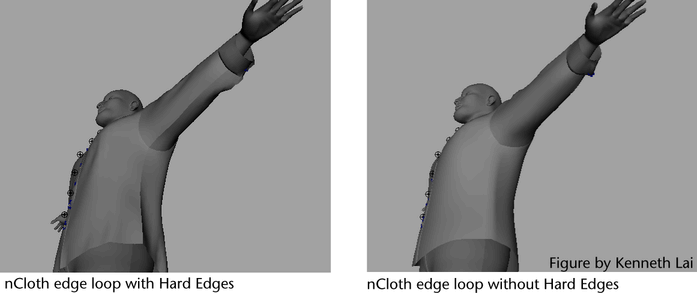
To create ridges on nCloth that resemble creases or seams
- Select the nCloth object (output mesh) on which you want to create a ridge to mimic a seam or crease.
- Select component selection mode.
- In the menu set, select Select > Select Edge Loop Tool.
- Double-click one of the edges in the row of edges you want to crease.
All the edges in the row or loop are now selected.
- In the menu set, select Normals > Harden Edge.
The edge loop you hardened is now a ridge that resembles a seam or crease on the nCloth object. This ridge retains its shape
during its nCloth’s simulation.
Create wind effects for nCloth
To affect nCloth with dynamic wind
- Select the nCloth object whose behavior you want to affect with dynamic wind.
- In the , select the nCloth object’s nucleus tab.
- Set the , , and attribute values. See Wind Speed, Wind Direction, and Wind Noise.
To block dynamic wind from affecting nCloth
- Select the nCloth or passive object that you want to obstruct the dynamic wind of its Nucleus system.
- In the , select the current object’s nClothShape or nRigidShape tab.
- In the properties section, set to the value you desire. See Wind Shadow Distance.
- (Optional) Turn on . See Wind Self Shadow.
- (Optional) Set the attribute value. See Wind Shadow Diffusion.
The affects of dynamic wind on the behavior of any nCloth objects that are blocked by the obstructing object are now reduced.
The magnitude of this reduction is dependent on the value you set.
