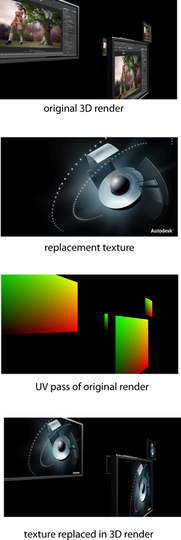
A UV pass converts UV values to R/G values and creates a rasterized version of UV space. Using a UV pass, you can replace textures in 3D renderings as a post-process, without the need to track new textures in place.
To create a UV pass for your workflow, do as follows:
Select your object, and in your Render Layer Editor, select Contribution > Create and Associate Pass Contribution Map.
 and select UVPass from the Create Render Passes window and click Create and Close to create the UV pass.
 to associate the UV pass with your scene, and then with your pass contribution map.
This option allows you to separate the object(s) in your compositing software in order to make further changes.
Create and add the miLabel attribute to the object's shape node. Click Select in the object's shape node Attribute Editor. Then select Attributes > Add Attribute.
You can now see the MI Label attribute under the Extra Attributes section of the shape node.
again and select Coverage from the Create Render Passes window and click Create and Close to create a coverage pass. The coverage pass provides the alpha for the object you want to retexture.
to associate the coverage pass with your render layer and then with your pass contribution map.
In your compositing software, you can then do as follows: