All attributes can be overridden on a per-layer basis. Some types of attributes, specifically those applying to Shading Groups and Member Overrides (Render Stats), automatically create layer overrides when you make changes. Other attributes require you to manually specify that you’re making per-layer overrides.
To change an object’s material on a per layer basis (auto-overrides)
 -click and select Assign New Material from the marking menus). Set the attributes of the material.
Layer overrides are less costly in terms of processing time than per-object overrides. For example, if you select all objects in a layer and override each object’s material assignments by assigning a Lambert shader to them in the scene view, this requires considerably more processing time than creating a material override on the layer that assigns a Lambert shader.
To override an attribute on a per layer basis (auto-overrides)
The attribute name appears in orange and bold type, indicating that a per-layer override has been made.
The change to the attributes of the Render Stats applies to the selected layer when Options > Auto Overrides is on. The attribute change applies to the Master layer (and therefore, all objects that are not otherwise overridden) if Options > Auto Overrides is off. You can do a manual override if Auto Overrides is off for Member Overrides. See the following procedure.
To override an attribute on a per layer basis (manual override)
-click the attribute you want to override (for example, Transparency) and select Create Layer Override from the menu that appears. 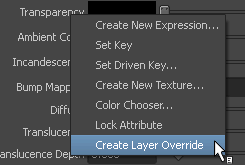
The name of the attribute appears in italic and orange text, indicating that it has been overridden on the particular layer.
If you switch between layers, you see the scene view change, showing a transparent override to the object in one layer, and the default shader assignment in another layer.
To remove an attribute override
-click the attribute whose override you want to remove and select Remove Layer Override from the menu that appears.


