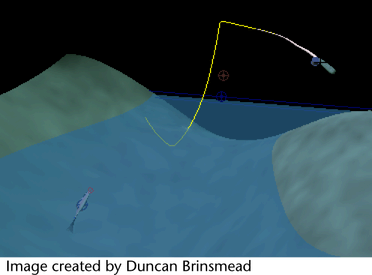
In this scenario a dynamic curve is created to simulate casting a fishing line. The is varied along the curve so it is somewhat stiff at the fishing rod end and very flexible along the fishing line. Particles
are set to emit from the dynamic curve to simulate water dripping off the fishing line once it’s been cast and reeled in.
To play the animation, click the link below.
fishing.mov
To make the fishing rod and line
- Create a new scene and switch to the Side orthographic view, then dolly out so you can see at least 30 spans.
- Using Create > CV Curve Tool, create a long curve of about 30 spans straight up the Y-axis. You can use grid snap to help you. This curve will be both
the fishing pole and the line.
- Create a narrow NURBS cylinder for the base of the rod and position it beneath the curve.
- Select the curve and to make it dynamic, select Hair > Make Selected Curves Dynamic.
- Select Hair > Display > .
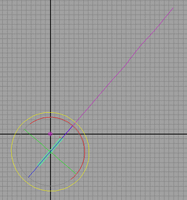
- Open (Window > Hypergraph: Hierarchy) and middle-drag the follicle under the cylinder. This parents the follicle to the cylinder.
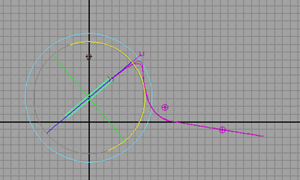
- Rotate the cylinder 45 degrees to the right, as in the image below. The curve rotates with it.
- Select the curve, then in the follicleShape in the , set to .
- In the hairSystemShape, do the following:
- in the section, set to 0.500 and Drag to 0.005.
- in the section, turn on and set the to -5.0.
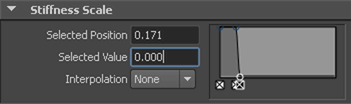
- in the section, edit graph by setting to and then add one point to the graph as shown in the image below. The first part of the graph represents the fishing pole
and has stiffness scale value of 1, while the rest is the fishing line with a stiffness scale value of 0.
- Play the simulation.
- Once the simulation has settled down, stop the simulation.
- Select Hair > Set Start Position > .
To add the water
- Select the curve and, in the menu set, select Edit Curves > Rebuild Curve >
 .
.
You want to add water dripping from just the part of the line which is under water.
- In the window, set the following and then click :
- Select the original curve (curveShape2) in the and hide it. (Display > Hide > )
- Using the X-axis as the water line, select a curve point at the point the fishing line is under water.
- Select Edit Curves > Detach Curves > , turn off and then click .
- Delete the first half of the curve.
- Select the remainder of the curve and select Particles > Emit from Object > .
- In the window, select as the , set to 0 and then click .
- Play to see the particles.
- Select the particles and in the particleShape tab in the , set the to 0.5.
- To add a gravity field, select Fields > Gravity.
- Select Display > Show > .
- Play the simulation to see the particles, which should be dripping downwards from the part of the line that is underwater.
To cast the fishing line
- Select the cylinder.
- Select Solvers > Interactive Playback. Make sure your playback frame range is high.
- Move the cylinder up above the water line.
- Rotate the cylinder backwards and then quickly forwards in the X direction to cast the line.
- If the line is not whippy enough, increase the value. If is already at 1, increase the Iterations until you achieve the desired effect.