Projection


Turns any 2d texture into a 3d texture you can place on the surface using one of the available projection types. Use to adjust the texture placement on the surface.

Find this utility in the Create Bar (see Hide, resize or customize the Create bar).

To use this utility, see Use the Projection utility.

Interactive Placement

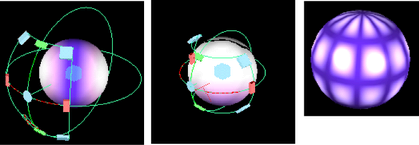
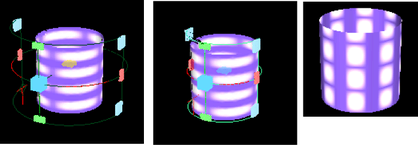
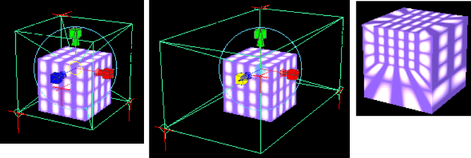
Displays the Projection manipulators in the scene view.

Tip

Use Fit To BBox to center the manipulator around the object.

Using these manipulators in combination with Maya’s transform tools, you can orient and position the texture map in three dimensions. The manipulators for texture mapping are exactly the same as those used for texturing polygons. See the Polygon modeling overview in the Polygonal Modeling guide for details.

NoteIf no place3dTexture node exists, Maya displays the following alert box:

Click the Create a placement node button to create the place3dTexture node.

Fit To BBox

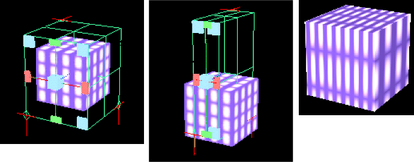
The texture map coincides with the bounding box of the mapped object or set. See also Interactive Placement.

Proj Type

Select a projection type from the drop-down list to display seven projection manipulators.

Off

Uses no projection type.

Planar

Default Proj Type. Places the texture on a planar surface and projects it onto the object.

Spherical

Places the texture inside a sphere and projects it onto the object.

Cylindrical

Places the texture inside a cylinder and projects it onto the object.

Ball

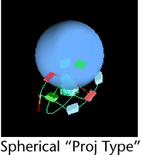
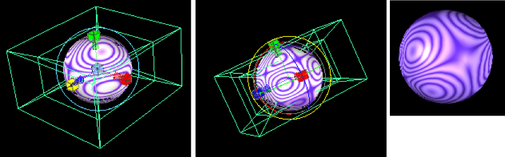
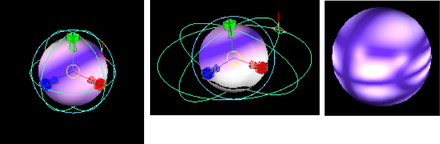
Places the texture inside a ball and projects it onto the object. For example, Maya projects the texture as if a candy wrapper is pulled around a lollipop. There is one pinch point to the mapping at the -z-pole, as opposed to the two pinch points at the +y and -y poles in spherical and cylindrical mapping.

Cubic

Defines the projection surface as a box. Maya places images on each plane and projects them onto the object.

Triplanar

Extrudes the texture along the axis defined by the maximum direction of the surface normal. The texture is projected much like fabric pulled around an arc.

Concentric

Projects a vertical slice of the texture from the inside to the outside edge of the voxel. The vertical slice used is randomly chosen for each voxel. A voxel is a 3D version of a rectangle—a voxel grid is a series of 3D cubes that line up to form a bigger cube.

Perspective

Integrates 3D elements with a background image or a live action sequence.

Examples

You have a background sequence with a vase on a table you want to blow up. It can be difficult to produce a parametric or solid texture map that exactly matches the vase, but if you use the Perspective Proj Type, you can project the real image of the vase from the background sequence onto a 3D vase placed in a matching position. This allows a perfect match of textures from the camera’s point of view.

You want to place a 3D flying saucer within an image of a street scene. The image of the street scene should accurately reflect onto the flying saucer. You could do this with an environment texture, but that would require that you have other images available—if you use the Perspective Proj Type, you can project the image of the street scene onto stand-in geometry. The image projected onto the stand-in geometry accurately reflects onto the flying saucer.

Image

The 2D texture to be used as a map.

Tip

To undo a mapping, in the Attribute Editor, right-click while the cursor is over the attribute’s name and select Break Connection from the pop-up menu.

U angle

For spherical and cylindrical mapping only. Changes the U angle.

V angle

For spherical mapping only. Changes the V angle.

Camera Projection Attributes

Control a Projection node when the Proj Type is Perspective.

Link To Camera

The drop-down list contains a list of the perspective cameras in the scene. Choose the camera from which you want to project the image.

Fit Type

Controls how the texture fits to the camera when Proj Type is Perspective. Select from the following:

None

The image is not squeezed or stretched to fit. One of its axes (determined by the Fit Fill setting) fits to the film gate, and the other resizes appropriately.

Match Camera Film Gate

Squeezes the image to fit the film gate.

Match Camera Resolution

If you use this to match a backdrop, match these settings to the settings in the Image Plane. Usually, the image plane is the same size as the rendered image. If so, use the Match Camera Resolution setting.

Fit Fill

Only available if Proj Type is Perspective and Fit Type is None. If the image plane aspect ratio is not the same as the film gate aspect ratio, this attribute decides which axis of the image is fit to the film gate.

Noise Attributes

Controls the amount of fractal noise added to a Projection node. (Adding fractal noise randomizes or blurs the texture).

Amplitude X/Amplitude Y

Scales the amount of fractal noise added to the projection in the X or Y direction. When Amplitude X and Amplitude Y are 0, no fractal noise is added.

Ratio

Controls the frequency of fractal noise. Increase this value to increase the fineness of detail.

Ripples

Determines how wavy the projected image is when projected, but controls the scale of the frequency of any fractal noise added to the texture. If increased in any direction, the fractal detail seems to smear out in that direction.

Recursion Depth

Depth

Controls the amount of calculation done by the texture when Ripples are added. Fractal noise such as ripples are created by a mathematical process; as the process goes over more levels, it produces a more detailed fractal, but takes longer. Normally, the texture chooses a level appropriate for the volume rendered. You can use Depth Min and Depth Max to control the minimum and maximum amount of calculation.