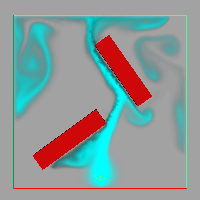
You can make fluids collide rather than pass through polygonal or NURBS surfaces. Either the fluid or object, or both can
be moving at the moment of collision. Fluids cannot collide with other fluids.
To collide fluids with geometry
- Create a dynamic fluid.
For details, see Dynamic Grids.
- Move the geometry you want the fluid to collide with inside the fluid container. The geometry must be inside the container
to be affected by the fluid.
- Select both the fluid container and the geometry (order doesn't matter).
- Select Fluid Effects > Make Collide >
 or click
  .
.
The window appears.
- Change the if necessary and click .
Maya internally converts NURBS objects to polygons before it animates the simulation. The sets the number of polygons created during the conversion. Lower numbers create coarser geometry and lessen animation accuracy
(which means more fluid will appear to pass through the geometry), but increase the playback speed and processing time.
The default is 200. Try doubling the value as many times as necessary to get the desired smoothness. (Select the geometry and click the
geoConnector tab in the .)
- Play the simulation using the playback controls at the bottom of the Maya window.
Tip
- To minimize the jagged effect where the fluid contacts the object, Maya redistributes the fluid into adjacent voxels and at
render time, softens the jagged edges. The redistribution of fluid can result in some fluid passing, or “seeping” through
the object. The seeped fluid won’t be noticeable if you use closed, opaque collision objects. Setting the attribute to linear should minimize the amount of seeped fluid at render time.
- Using NURBSs for collision geometry (especially with trims, or other construction history) will impact performance.
- If the mesh of your collision object has complicated concave faces, try triangulating larger faces to prevent interior areas
from being filled in by the fluid. Perform a (by selecting ) on all the edges, to remove small interior faces, then triangulate the it, and quadrangulated it, to give lighter geometry.
- To avoid a triangle appearance around the edges of the geometry, subdivide the faces that are causing the most problems.
Disable a collision effect
You can temporarily disable a collision effect to speed playback
To temporarily disable a collision effect
- Select the fluid container.
- In the section of the fluidShape , turn off .
To disable a collision effect
- Select the fluid container.
- Select Window > Relationship Editors > Dynamic Relationships to open the Editor.
- In the section, select .
The left column highlights the colliding fluid object. The right column highlights the collision objects.
- In the right column, click the highlighted collision object.
You can also in (Window > Hypergraph: Hierarchy), delete the geoConnector nodes linked to the fluid and the collision object.
The item is no longer highlighted, which means it's disconnected. For details on using the Editor, see the Dynamics guide.

 or click
  .
.