Edit wave nonlinear deformers


Tip
  • Offset and Min Radius manipulators are both at the center of the handle by default.
  • Adjust Dropoff from the Channel Box.

To edit wave deformers by using handle manipulators

  1. Select the wave deformer node (default name: waven).
  2. Select the Show Manipulator Tool (default shortcut: t key).
  3. In the scene, select one of the manipulators on the wave deformer handle.

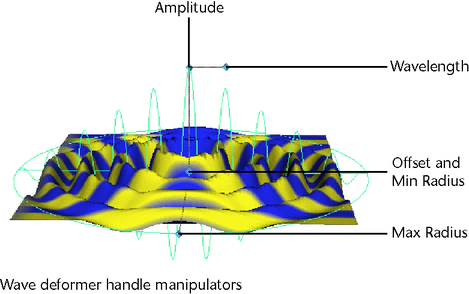
    The manipulators on the wave deformer handle let you edit attributes.

  4. -drag the mouse to edit interactively. Note that the Channel Box updates the values you are changing.

    The Offset and Min Radius manipulators are both located at the center of the handle by default.

To edit by moving, rotating or scaling handle

  1. Select the wave deformer handle node (default name: wavenHandle).
  2. Move (translate), rotate, or scale the handle to change the effect of the deformation.
  3. Move or rotate the handle pivot point by pressing the (Linux and Windows) or (Mac OS X) key, moving the pivot point, and then pressing the or key again.

    Remember that you can access the deformer handle’s local axes (Display > Transform Display > Local Rotation Axes), rotate and scale pivots (Display > Transform Display > Rotate Pivots or Scale Pivots) and selection handle (Display > Transform Display > Selection Handle).

To edit waved deformers with the Channel Box

  1. Select the wave deformer node (default name: waven).

    One quick way to select the wave deformer node is to select the object being deformed, and then select the wave deformer node in its history from the Channel Box (under INPUTS).

    Note that you can control which attributes are listed as keyable attributes (channels) in the Channel Box with the Channel Control editor (select Window > General Editors > Channel Control).

  2. Click the name of the channel you want to edit.
  3. In your scene, -click and move the mouse to the left or right. By moving the mouse, you change the value of the selected channel. As you move the mouse, note that pressing the key gives you finer control, and pressing the key gives you less control.

To edit wave deformers with the Attribute Editor

  1. Select the wave deformer node (default name: waven).
  2. Open the Attribute Editor by selecting Window > Attribute Editor or use the default shortcut +a.
  3. Edit the attributes.

    See wave.

To delete a wave deformer

  1. Select the wave deformer handle.
  2. Select Edit > Delete or us the default shortcut (Linux and Windows) or (Mac OS X) key.

    The wave deformer handle, wave deformer handle shape, and wave deformer nodes are all deleted. However, the object still has the tweak node as an input node, so any tweaks you might have made are preserved. Also, note that the various input nodes that structure the evaluation of the deformation are not deleted.

Wave deformer example

Ripple animation

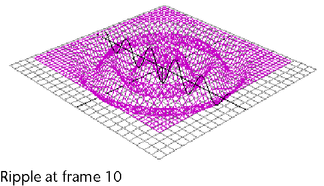
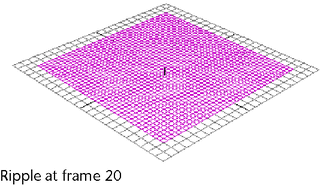
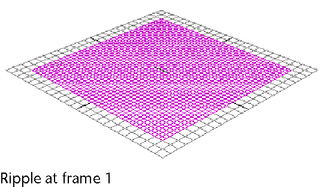
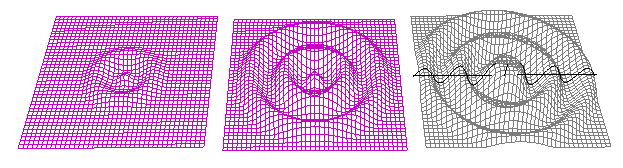
You can create ripple effects by using a wave deformer on a NURBS or polygonal surface. This example shows how you can create a simple ripple effect on a NURBS plane.

To create the NURBS plane

  1. Create a NURBS plane, using the default creation options except set Width to 20, U Patches to 40, and V Patches to 40.

To create a wave deformer

  1. With the plane selected, create a wave deformer for the plane with the following creation options:
    Min Radius

    0

    Max Radius

    1

    Amplitude

    0.2

    Wavelength

    0.4

    Dropoff

    1

    Offset

    0

The result follows:

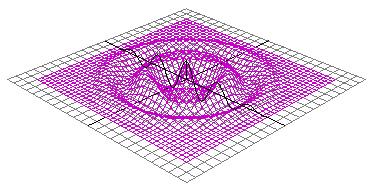
Next, you will set keys at frames 1, 10, and 20.

To key ripple at frame 1

  1. In the Time Slider, select frame 1.
  2. In the Channel Box, set wave1’s attributes as follows:
    Amplitude

    0.0

    Max Radius

    0.1

  3. Set keys for all of wave1’s attributes.

To key ripple at frame 10

  1. In the Time Slider, select frame 10.
  2. In the Channel Box, set wave1’s attributes as follows:
    • Amplitude: -0.2 (negative value allows first wavelet to go down)
    • Dropoff Position: 0.5
    • Max Radius: 1

    The result is as follows:

  3. Set keys for all of wave1’s attributes.

To key ripple at frame 20

  1. In the Time Slider, select frame 20.
  2. In the Channel Box, set wave1’s attributes as follows:
    • Min Radius: 1
    • Amplitude: -0.1

    The result is as follows:

  3. Set keys for all of wave1’s attributes.

To see the ripple

  1. Scrub or play the animation.
  2. You can create more intricate and complicated rippling effects by continuing to adjust the wave deformer’s attributes. You can also apply additional wave or sine deformers to the plane for more complex results.
    TipInstead of animating the Dropoff Position attribute, you could write an expression that drives the drop off of the wave. The expression would be as follows:

    wave1.offset = wave1.wavelength * .25;