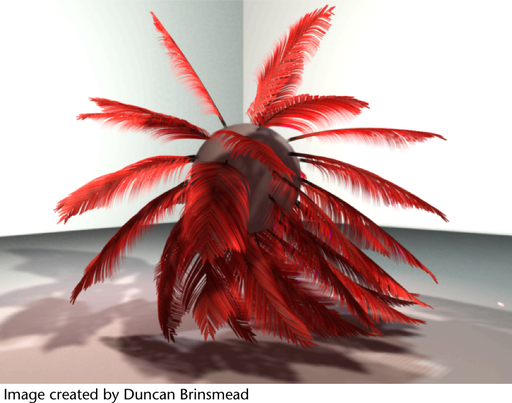
You can assign a Paint Effects brush to the hair system. This is useful for creating effects, such as vines or feathers for hair. The hair output can be Paint Effects or NURBS curves.
To assign a Paint Effects brush to hair
For a better looking polygon, before converting, decrease the brush width (0.05) and set flatness to 1.
Tips for Paint Effects brushes assigned to Hair
Hair system hairs become stroke paths for an assigned brush, so each hair is like a brush stroke. The normal of these strokes is determined by the hair's twist vector (as opposed to the surface normal with the regular Paint Effects stroke). The Brush Width attribute on the brush is overridden by the Hair Width attribute on the hair system. The Color1 attribute on the brush is overridden by the hair system color (Hair Color * Hair Color Scale + HSV Rand). Likewise the Specular Color, Specular Power, Translucence, and Multi Streak attributes on the hair system override those on the brush. All other attributes on the hair system, such as Curl and Turbulence, are applied in addition to any similar effects on the brush.
Using Brushes with Tubes turned off
When a brush with Tubes turned off is assigned to a hair system, each hair is like a regular stroke with the width being the Hair Width * Hair Width Scale (the Brush Width on the brush is ignored). This provides a way in which different Brush Types, such as Paint or Mesh can be used to render the hairs. For example you could make the hairs look like ribbons, or strings of pearls.
Generally when doing this you need to set the Hair Width to the desired Brush Width and make the Hair Color attribute the same as the color1 values from the brush. If the brush is textured you will also usually need to increase the u repeat value on the brush (depending on width and length of the hairs).
Using Brushes with Tubes turned on
When assigning a brush with Tubes turned on, you usually want to modify it to better follow the hairs.
Most preset brushes will generate new tubes along the length of each hair. To have the brush instead emit a single tube (or tree) exactly at the base of each hair set the following in the brush’s Attribute Editor:
Then in the hair system’s Attribute Editor, set:
Now to make the tubes better follow the hair curves, set the following in the brush’s Attribute Editor:
In doing this the relationship of segments on the brush to CVs on the hairs can affect the results. You may wish to have both values be similar. To adjust segments on the hairs you can either edit the hair system’s Sub Segments or the follicle’s Sample Density (the latter will also affect the dynamic simulation). The segments on the brush can be adjusted through the Segments, Petal and Leaf Segments attributes.


