You can use the node to quickly create photorealistic procedural textures using a library of organic, fabric, and material presets.
Creating a shading network using substance textures
- Select and ensure that the Substance plug-in is loaded.
- Select in the panel menus for best results.
- Select to open the window.
- Select .
Note
Do not use the node, which is an intermediate node that is created automatically by the node.
- In the , attribute, navigate to your <Maya Directory>\substances folder (or the folder in which your substance texture is installed) and select a substance texture.
NoteBy default, the substance texture files are installed to your <Maya Directory >\substances folder. However, it is recommended that you copy the textures that you need to your <MayaProject>\sourceimages folder instead. This ensures that your substance files are loaded properly on all operating systems. You should only copy
those textures that you will use, as the substance library includes a large number of files, and you would not want to copy
all of them to your project sourceimages folder.
- Click .
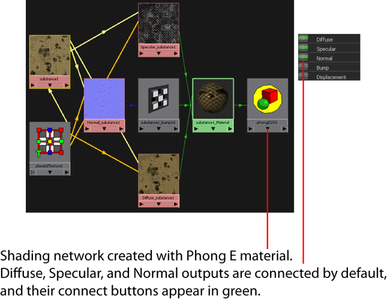
This creates a shading network with a material that, by default, connects the , , and substance outputs.
Note
The , , and substance outputs are marked with green connect icons  to indicate that these output nodes have been created and are connected to the material shader.
You can now apply this material to the objects in your scene.
- Select the resolution for your substance output nodes.
- Expand the section and select the format for your normal map (if a substance output is available for the substance you have selected).
- Expand the section in the substance and tweak the attributes provided to customize the appearance of your shader. Procedural controls are built into each substance
so you can easily create unique effects. Experiment with these sliders and view the changes in real time in the Maya scene
view.
You can tweak attributes such as to shift the global color range of the texture, or to control the brightness level, or to control the level of color purity, or to adjust the attenuation of depth of the texture and so forth.
There are also other interesting effects such as . For example, with Painted_Wood, increasing the age slider peels away the paint to reveal a more aged wood look, and with
Modern_Concrete, increasing the age slider reveals the rebar in the concrete. With Volcano_Rock, you can tweak the , and attributes to customize the look of your volcano lava and so forth.
See Extra Attributes for more information.
- If you want to connect additional substance outputs to your shading network, such as a or map, click on the Connect
 icon beside the list of available substance outputs.
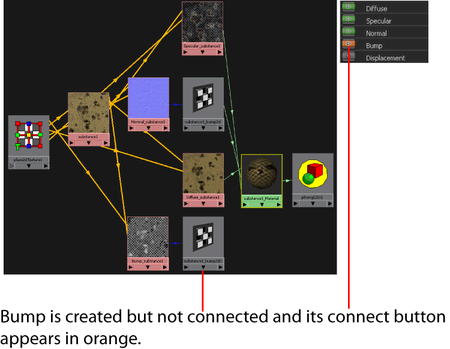
If the input of the material attribute is already occupied by another substance output, for example , then a warning message appears, and the output is created but not connected. The substance output connect icon appears orange.
You can then delete the connected output and re-attach a new output in its place.
Tip
A grey connect icon (initial state) denotes that no node has been created yet for this output map. An orange connect icon denotes that an output node is created but not connected
to another node. A green connect icon denotes that the node has been created and is connected to another node.
Note
The Maya software renderer is not recommended for use with normal maps. If you want to render unbaked substance textures using
the Maya software renderer, use bump maps instead of normal maps. Alternatively, you can use mental ray rendering with baked
normal maps.
Note
Only a subset of the attributes in the place2dTexture node work with substances in the viewport or the hardware renderer:
, , , , and . The remaining attributes all work with substances when rendered.
Note
You can modify your choice of substance file and the shading network connections are retained.
You can now use the shading network in the Maya viewport, and render it using the Maya hardware renderer or software renderer.
If you want to export the shading network to a game engine, or to render it in mental ray, you must export the images to disk.
Exporting images to disk
- Click in the .
Using this feature, all nodes connected to the node (including both outputs denoted by green and orange icons) are baked onto disk.
The window appears.
- Select your map resolution and image format.
Note
mental ray for Maya does not support LZW compressed .tif files. To work around this, add IMF_TIFF_COMPRESSION=none to your Maya.env file.
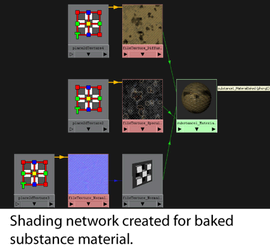
- Select the option to create a shading network with connections to the texture files baked from the substance output maps.
- Click to write your file textures to disk.