The gives you tools to layout and manage camera shots, then produce rendered movie footage of the animation in your scene. You
can start to layout shots in Maya, or by importing your own editorial files containing audio and video clip information in
AAF or FCP format. Even for large scenes, you can produce movie clips to achieve real-time playback.
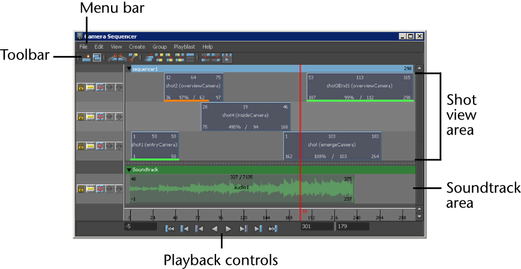
In the window, shots are represented as a set of rectangles arranged on tracks, and you define and manipulate which camera is active
at any point in time by manipulating the camera shots. When you’re satisfied with the layout and timing of camera shots, you
can playblast movie clips of the animation.
Important
(Mac OS X) support on 64-bit systems is limited. For better performance and real-time results, run Maya in 32-bit mode to use the .
This tool consists of the following main areas:
The following table provides a brief overview of tasks using the .
| To... |
Do this |
| Create a shot.
|
Click  . .
|
| Frame all shots.
|
Click  . .
|
 Create a single camera to playback all shots.
|
Select .
|
| Scroll the shot view area.
|
 + +  -drag (Linux and Windows) or -drag (Linux and Windows) or  + -drag (Mac OS X). + -drag (Mac OS X).
|
| Move a shot.
|
Drag single shots to move them, or Shift-click to select multiple shots then drag in the white rectangular area. |
| Scale a shot.
|
Drag the bottom corners of the clip. (The Scale cursor  appears.) appears.)
|
| Trim a shot.
|
Drag the top corners of the clip. (The Trim cursor  appears.) appears.)
|
| Mute a shot.
|
 -click the shot and select -click the shot and select
|
| Delete a shot.
|
Select the shot and press  . .
|
| Playblast a sequence into a movie.
|
-click the shot you want and select from the pop-up menu.
|
| Group shots.
|
Select the shots you want to group and select .
|
| Add audio to a shot.
|
Select the shot, then select from the menu bar.
|
| Add an image plane to the shot camera.
|
-click the shot and select .
|