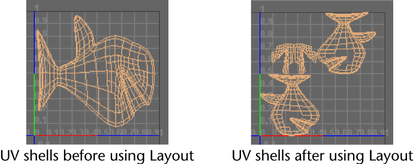
The feature automatically repositions UV shells so they don’t overlap in UV texture space and maximizes the spacing and fit between
them. This is useful for ensuring that the UV shells occupy their own separate UV texture space. For example, if you are applying
Fur to a surface, the UV texture coordinates on a given shell must not overlap.
In general, you should keep UV shells separated for convenience and clarity. It is not absolutely necessary to keep UV shells
separate. For example, you may want the UV shells to overlap so different faces use the same region of a texture.
You can also use the feature to:
- Scale or stretch the UV shells to fit within the 0 to 1 coordinates of the . This is useful if you need to maximize the texture space used when creating a texture map. For example, when using 3D Paint.
- Flip UV shells that correspond to opposite sides of a model. This automatically corrects the orientation of the UV shell if
the UV winding order is incorrect. See Display UV winding order.
- Arrange the UV layout of multiple selected objects simultaneously. This improves your efficiency when you need to quickly
sort the UVs for multiple objects within the , or when multiple objects need to share different parts of the same texture.
By default, when Layout is used with multiple objects, the UVs for each object are placed individually. As a result, they
overlap each other within the . This saves you the work of having to lay out each UV set individually. When the option is set to , the UVs are laid out as if all of the objects were combined as one.
The feature is also available from within the by selecting from the ’s menu bar.
Note
Before using you should already have performed the necessary UV projection mapping or . That is, the feature will only arrange existing UV texture coordinates, it will not create them.
To lay out UVs for multiple objects simultaneously
- Select the objects or faces whose UVs you want to lay out.
- Select Edit UVs > UV Texture Editor to display the .
- In the , select Edit UVs > Layout>
 .
.
The window appears.
- In the window set the following options depending on your required outcomes:
- Set to (default) when you require multiple object’s UVs to overlap within the UV texture space.
- Set to when you require the UVs to be separated. This is useful when you need each UV set to be separate and distinct from each
other.
- Set to to maximize the spacing and fit between the UV shells.
- Set the option to adjust the spacing between UV shells by specifying how the bounding shape for the UV shells will be described.
In general, the UV layout will have more space when the option is set, and less space when the Shape option is set. When the is set to the shells are scaled to make optimal use of the UV texture space.
- Click to perform the layout operation or if you want to perform the operation and close the window.