The Unfold feature lets you unwrap the UV mesh for a polygonal object while trying to ensure that the UVs do not overlap. Unfolding UVs helps to minimize the distortion of texture maps on organic polygon meshes by optimizing the position of the UV coordinates so they more closely reflect the original polygon mesh.
For example, if the initial shape of the UVs results in a distorted texture pattern on the surface mesh, you can use the Unfold feature to minimize the distortion because it attempts to maintain the UV’s relationship relative to the original surface mesh.

These are descriptions for the options in the Unfold Options window.
A bias setting that determines the weighting between two unfold solver types: local and global.
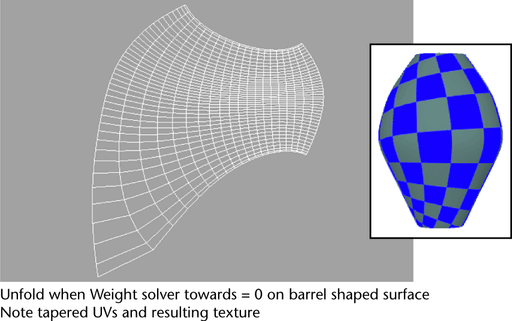
When Weight Solver towards is set to 0 (default) a local solver is used for the unfolding calculations.
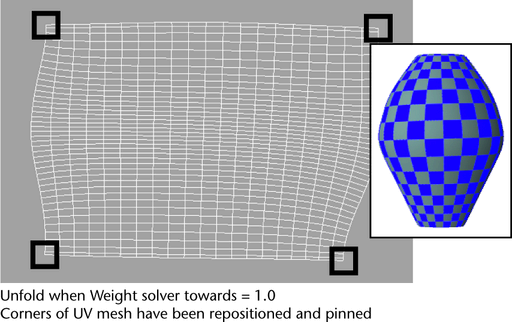
When the Weight solver towards is set to 1 a global solver is used for the unfolding calculations.
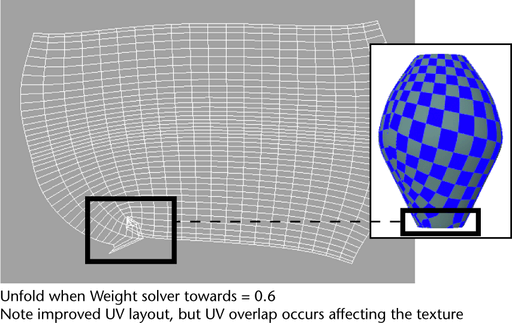
When the Weight solver towards is set anywhere between 0 and 1, the unfolding results are based on the combined solver calculations.
A Weight Solver towards setting of 0 is recommended for the majority of unfolding operations and provides the quickest results.
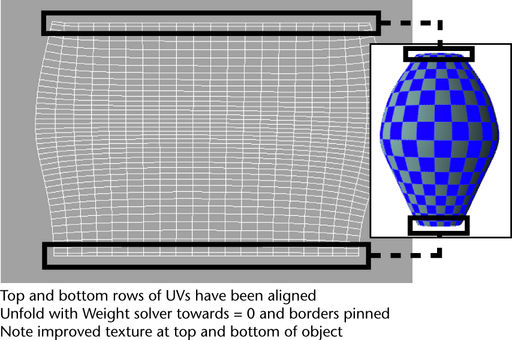
Some polygon configurations can cause the Unfold feature to produce an undesired tapering effect on the unwrapped result. For example, the tapered shape from the thigh towards the ankle on a character’s pant leg may result in a more exaggerated tapering as a result of how the local solver works when it unfolds the UVs. When this occurs, the results can usually be improved by performing additional unfold operations with the Weight solver towards setting set to a value above 0 so that the global solver is taken into account. The unfold operation will take substantially longer, but the tapering effect will be reduced. Once the scale is more uniform, you can carefully pin UVs to control areas that were previously at different scales to ensure they don’t revert back. Once the UVs are pinned, you can perform subsequent unfold operations with the Weight solver towards setting at 0.
For an example of how this works see Solver weighting example.
Specifies which polygon comparison method is used for the unfolding operation. This setting is only available when the Weight solver towards setting is greater than 0 and can be biased towards two comparison methods:
When the Face area/Edge length bias setting is set to 0.5 (the default) both methods of comparison have equal weighting in determining the final result. In general, this is a good starting point for the majority of unfold calculations.
Polygon meshes with high areas of curvature can have better unfold results when the bias is set towards Face area. This setting minimizes the buckling of the texture map in the areas of curvature. However, if the bias setting is set fully towards Face area, a shearing effect on the texture can occur as a result of the calculations attempting to work within the constraints specified by the Face area bias.
Use the following options to unfold only selected portions of the UV shell.
Lets you perform the Unfold operation but pin specific UV combinations.
Maintains the position of only the selected UVs during the unfold operation.
By default, Unfold repositions all of the selected UVs during the unfold operation and the unselected UVs remain pinned. This option reverses that default behavior. This option can be useful when specific UVs are already in a desired pattern when unfolded and you need some of the UVs to remain unaffected by subsequent unfold operations.
Specifies the maximum number of repeated calculations allowed for the unfold solver when calculating the final unfolded result if the Stopping threshold value has not been reached. When this maximum occurs, the unfold calculations will stop.
If the calculations appear to stop prematurely, it simply means that the Stopping threshold has been reached. The default is 5000. Setting the Maximum iterations higher than 5000 causes the Unfold feature to calculate further towards the Stopping threshold and lengthens the time for the unfold calculation.
If the Weight solver towards setting is any value above 0, you may wish to initially set Maximum iterations to a smaller value such as 50 for your initial unfold iteration.
Specifies a mathematical threshold to stop the unfold calculations. The value is based on an internally computed relative percentage of overall improvement when comparing the angles, distances, and areas between the original polygon mesh and the unfolded result. The unfold calculations will progress until this percentage threshold is reached or until the maximum number of iterations specified by the Maximum iterations setting is reached.
Setting the value smaller than 0.001 will result in longer times when unfolding. If time is not of concern, you can also set the Stopping threshold to 0 and allow the Unfold feature to calculate the best result.
Resizes each final unfolded UV shell to match the Scale Factor once the unfold calculations are complete. It accomplishes this by first determining the surface area of the polygon mesh in object space (XYZ), comparing it to the unfolded UV meshes' surface area, and then scaling the UV mesh by that value.
This option is useful when multiple shells are unfolded and you require them to have a similar scale between them.
A ratio value that determines the amount of Rescale. A Scale Factor greater than 1 results in the UV mesh being scaled larger, whereas a Scale factor less than 1 results in the UV mesh being scaled smaller.
For example, if a polygon mesh had a unit size of 1 in the scene view, a Scale factor setting of 0.02 would result in the corresponding UV mesh having a unit size of 0.02 in the UV Texture Editor.
When Keep History is turned on, the Unfold feature automatically recalculates the UV texture coordinate positions for the shell whenever the polygon model’s mesh is changed. This provides an effect where the texture appears to be distorted inwards or outwards along the surface when the mesh is deformed.
Turning Keep History on can result in long computation times when the polygon object is animated thereby affecting interactive performance. It should be turned on only when you specifically want this special effect to occur and are aware of the impact on interactive performance in your scene as a result.
The following example demonstrates how changing the Weight solver towards option in combination with pinning and aligning UVs helps to control the unfolded UV layout and the texture mapping that results.


 .
.