Makes the edges of surfaces tangent or curvature continuous.
> 
-
-
Select if you want to attach the surfaces as well as align.
-
-
When objects are joined, are created at the. Select to retain these knots.
Select to remove as many knots as possible without changing the shape of the object when the attach is performed.
-
-
means that two surfaces share a boundary. options let you specify how to achieve continuity for the two surfaces.
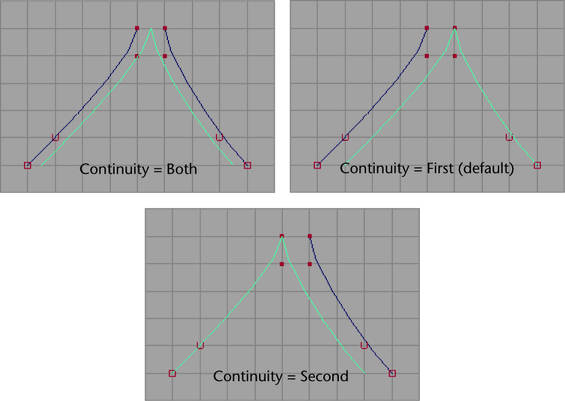
Positional continuity means that the ends of two surfaces meet exactly. The following figure shows a side view of how surfaces
are aligned with each option (, , and ). The alignment occurs depending on which surface is selected first (white) and last (green).
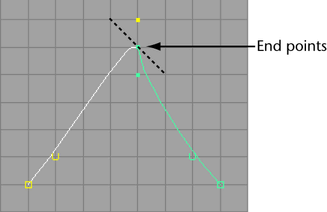
continuity exists when two surfaces are placed end to end, and the tangents at the endpoints also match. An example side
view of aligned surfaces follows:
continuity exists when two surfaces that meet with tangent continuity also have the same curvature at the joint. When this
option is selected, the curvature scale sliders are enabled.
- , ,
-
You can choose the order you want the surface modified. The following tables show what is modified with the different options.
|
|
Surfaces |
|
Only the shape of the first surface you select is modified.
|
The entire first surface moves so its end boundary coincides with the start boundary of the second surface. Some adjustments
are made to the first surface end boundary CVs.
|
|
Only the shape of the second surface you select is modified.
|
The entire second surface moves so its start boundary coincides with the end boundary of the first surface. Some adjustments
are made to the second surface start boundary CVs.
|
|
The shapes of both the first and second surfaces you select are modified.
|
The entire first and second surfaces move so that the end boundary of the first surface and the start boundary of the second
surface coincide. The adjacent boundary CVs move halfway along the line of minimum distance.
|
|
|
Surfaces |
|
Only the shape of the first surface you select is modified.
|
All the end boundary CVs of the first surface move to coincide with the adjacent start boundary CVs of the second surface.
|
|
Only the shape of the second surface you select is modified.
|
All the start boundary CVs of the second surface move to coincide with the adjacent end boundary CVs of the first surface.
|
|
The shapes of both the first and second surfaces you select are modified.
|
All the end boundary CVs of the first surface and the start boundary CVs of the second surface move to coincide with each
other. The adjacent CVs move halfway along the line of minimum distance.
|
|
|
Surfaces |
|
Only the shape of the first surface you select is modified.
|
The tangents at the end boundary of the first surface adjust to coincide with the tangents at the start boundary of the second
surface.
|
|
Only the shape of the second surface you select is modified.
|
The tangents at the start boundary of the second surface adjust to coincide with the tangents at the end boundary of the first
surface.
|
Note
continuity is applied to the surface that is modified for tangent continuity (see the table above).
- ,
-
The values in the and boxes increase or decrease the tangent magnitude or curvature at the end of the surface. You can enter a value in the box
or drag the slider bar. The following table shows what happens when the tangent and curvature is scaled.
|
|
Surfaces |
|
Only the shape of the first surface you select is scaled.
|
The tangent magnitude at the end boundary of the first surface adjusts.
|
|
Only the shape of the second surface you select is scaled.
|
The tangent magnitude at the start boundary of the second surface adjusts.
|
|
|
Surfaces |
|
Only the shape of the first surface you select is scaled.
|
The curvature at the end boundary of the first surface adjusts.
|
|
Only the shape of the second surface you select is scaled.
|
The curvature at the start boundary of the second surface adjusts.
|
-
-
If is off, the original surfaces are replaced with the aligned surfaces. If on, two new surfaces are created and the originals
are retained.
-
-
The information is read-only. It gives you access to the history of the surfaces you aligned. Click the arrow buttons to select
an input surface and open its section of the editor.
-
-
The slider becomes available depending on the you select. Use to define the parameter on the first/second surface at which the alignment is performed.
-
-
The and options for surfaces define whether the surfaces have to be reversed and or swapped before performing the alignment (remember,
align uses the end of the first surface and the start of the second). The reverse is done in the direction defined by (on or off) in the .
-
-
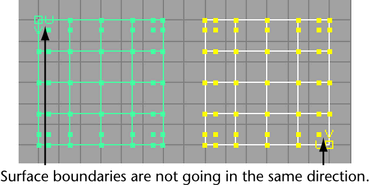
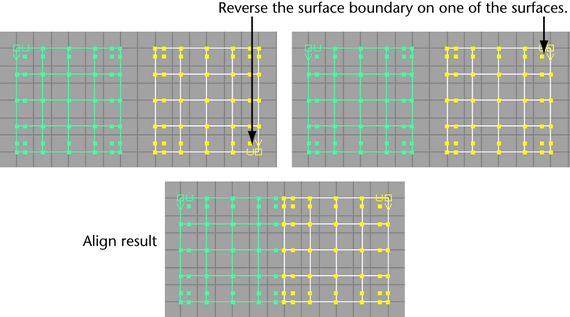
If is turned on, the second surface is also reversed in the opposite direction of . Turn this on if your aligned surface is twisted.
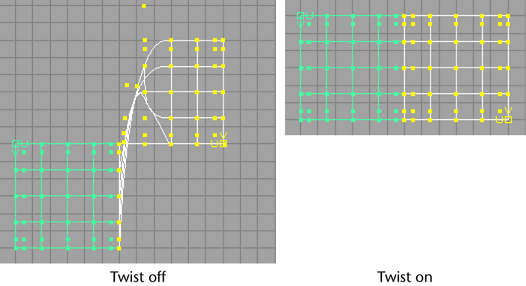
For example, if you align the surfaces and the surface boundaries are going in different directions, the following results.
When you select the surfaces, the align result is twisted. Turn on either from the or in the to correct the problem.
The other alternative is to check the surface U/V direction before you align the surfaces. Use Edit NURBS > Reverse Surface Direction to reverse the surface directions if necessary.
Note
computes the twist values for edges, so you do not need to align surfaces then turn on the twist attribute to get a clean
join.
-
-
The I sections are the same as the options in the options window. The sliders become available depending on which type of continuity you select.
