You can style Fur using Maya Hair curves. The fur is influenced by the shape and position of the hair curves. You can either
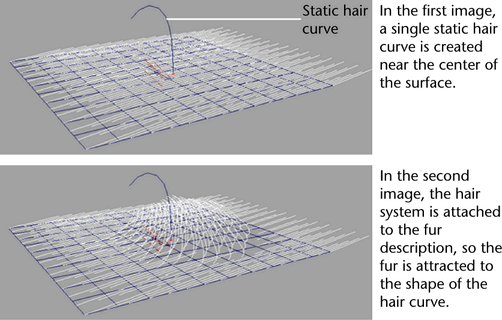
create a grid of hair curves on a surface or place hair curves on selected points/faces. You use static hair curves for styling.
You can also add movement to fur using dynamic curves; see Add movement to fur.
The workflow involves creating a hair system (Hair > Create Hair >  ), which has many setup options. Consider reading some topics in the Hair guide, including:
The basic workflow for adding movement to fur is as follows
- Add fur to the surface. For details, see Creating and modifying fur.
- Create a hair system to be used with Fur. For details, see To create a hair system to be used with fur.
- Attach the hair system to the fur description. See Attach and detach a hair system to/from fur.
A furCurveAttractor set is created.
- Modify attractor set attributes. For details, see Change fur curve attractor set attributes.
- Edit the start position of the curves.
Create a hair system to be used with fur
To style fur using hair curves, create a hair system with static curves.
To create a hair system to be used with fur
- Select the surface, points or faces on the fur model.
- In the menu set, select Hair > Create Hair > .
- Select or from the drop-down list.
Note
It is the NURBS curves that will attract the Fur. You can mix Hair and Fur together by selecting Maya® Paint Effects™ and NURBS curves output, and using the curves to control the fur. This might be useful if you wanted an overall base coat
of thick fur which has the same dynamics as a few clumps of longer hair.
- Select to flood the selection with curves, or select to create a hair curve at each of the selected points or faces.
- Select to manually style the fur.
- Make other desired selections/settings. For more information, seeHair > Create Hairin the Hair guide.
- Click .
The curves appear on the selected surface, points or faces and a hairSystem node is created.
To style the fur using hair curves
- Do any of the following:
Attach and detach a hair system to/from fur
In order for the fur to be influenced by hair curves, you must attach a hair system to the fur description. The result is
a fur curve attractor set.
Note
Only hair created from NURBS curves can be used to influence fur. When creating hair that you want to use to influence fur,
make sure you, select or from the drop-down list.
To attach an existing hair system to a Fur description
- Do one of the following:
- Select the hairSystem and, in the menu set, select Fur > Attach Hair System to Furand then select the desired fur description from the submenu.
- Select Window > Relationship Editors > Hair/Fur Linking. In the window, select the desired in the left pane and the desired in the right pane. The highlighted items are connected.
Note
You can attach more than one fur description to the same hair system.
To detach a hair system from a Fur description
- Do one of the following:
- Select the hairSystem and, in the menu set, select Fur > Detach Hair System from Furand then select the desired fur description from the submenu.
- Select Window > Relationship Editors > Hair/Fur Linking. In the window, select the desired in the right pane. When the is no longer highlighted, it is disconnected from the .