Label a skeleton’s joints


There are a few methods for labelling the joints of your skeleton:

Automatically label a skeleton’s joints

To automatically label the joints of your skeleton’s limbs

For the limbs of your source and target skeletons, do the following:

  1. Select Skeleton > Joint Labelling > Show All Labels.

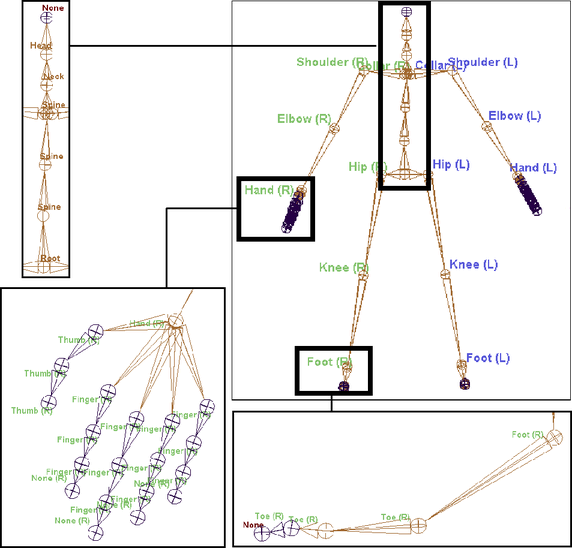
    Joints labels will now appear in the scene view. See Skeleton > Joint Labelling > Show All Labels.

  2. Select Skeleton > Joint Labelling > Add Joint Labels.
  3. In the scene view, select the parent or top joint of each limb (joint chain) in your skeleton and do the following:
    • Select Skeleton > Joint Labelling > Add Joint Labels, then select a side label (Label Center, Label Left, Label Right) in the Add Joint Labels menu.
    • Select Skeleton > Joint Labelling > Add Joint Labels, then select a type label (Label Arm or Label Leg).

    Each joint, from the selected parent down its joint chain’s hierarchy, is automatically labeled according to their positions in their respective joint chain.

    For example, if you select the left shoulder joint of a skeleton and click Label Left and then Label Arm in the Add Joint Labels menu, then that joint will be labelled as Shoulder(L), the next joint in the chain will be automatically labeled as Elbow(L), and the next joint will be labeled as Hand(L) and so on.

    Note

    For arms, the forearm joint is labelled as an elbow joint. For legs, the ankle joint is labelled as a foot joint.

  4. If you want to adjust or change the labels of your joints, Adjusting joint labels.

Adjusting joint labels

To set or adjust individual joint labels from the Attribute Editor

  1. Select the joint in your source or target skeleton whose labelling you want to change and open the Attribute Editor.
  2. In the Joint section of your joint node’s tab, expand Joint Mapping.

    The Side and Type drop-down menus appear.

  3. Set or change the joint’s Side and Type labels as desired.