Lets you select objects and components in view panels and the texture editor.

Use the Tool Settings window to specify reflection and Soft Selection settings. When you work in a texture editor panel, the Select Tool has texture-editor specific options.
Sets the shape of the falloff region.
When the Falloff Mode is set to Surface, the falloff is based on a circular region that conforms to the contours of the surface. Surface mode is useful when you want the Soft Selection falloff to conform to a surface. For example, you can separate the upper lip from the bottom lip on a characters face using the surface-based falloff mode.
Sets the size of the area of falloff around the selected region. The area defined by the radius depends on the Falloff Mode and whether the Selection Mode is set to Around Selection.
You can also adjust this value by turning on Soft Selection and pressing the b +  for relative resize or b +
  for absolute resize, while simultaneously dragging the mouse left or right.
Controls the weighting of the falloff within the area defined by the Falloff Radius. The graph represents the strength of the selection’s influence versus the distance from the selection.
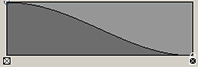
The default shape of the Falloff Curve specifies more influence close to the selected area and less influence at the outer edges of the Falloff Radius. The shape of the Falloff Curve can be manually adjusted by dragging existing points on it. You can add additional points by clicking the graph.
Controls the way values are calculated from point to point on the Falloff curve. The default is Smooth.
Preset shapes for the Falloff curve. For more information, see Change the shape of the falloff area.

Defines the appearance of the weighted falloff region for a soft selected area. You can adjust the weighting of each color by dragging the small circles above the ramp left and right. You can add new colors by clicking on the ramp itself. You can remove colors by clicking their corresponding boxes below the ramp. You can adjust each color using the Color slider.
Allows you to change the color of the currently selected falloff color. You can select these by clicking the circle corresponding to them above the Falloff color ramp.
You can select a color by clicking the colored box and then selecting a color from the Color Chooser. You can adjust the shade of the current color by dragging the slider left or right.
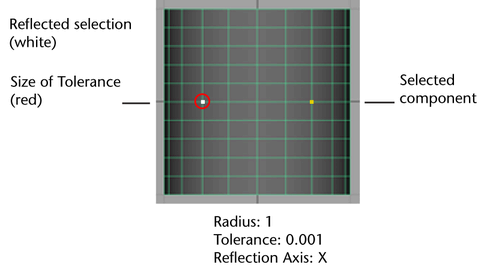
Sets how closely the selected component and the component across the reflection axis have to mirror each other in order to be considered a reflection. It only has an effect when Soft Selection is turned off.
When the value is set very low, a component must be almost exactly mirrored across the seam to be considered a reflection. Higher values allow the component’s position to vary slightly and still be considered a reflection. Increasing the Tolerance is useful when you want to select reflected components on a mesh that isn’t quite symmetrical.
The Tolerance value should only be a small fraction of the distance between components. For example, if each vertex is 0.1 units from the vertex next to it, then a Tolerance of 0.001 is appropriate.
When turned on, Maya does not allow operations on the seam that result in a non-symmetrical mesh.
For example, if you select a vertex on the seam of a model, you are unable to move it away from the seam. Note that you are still able to move it along the seam since this action still maintains the model’s symmetry.
Sets the falloff around the reflection seam when Preserve Seam is on. This controls how smooth transformations near the seam appear when components on the seam itself cannot be transformed away from the axis of reflection.
Higher values increase the amount of falloff making your transformations near the seam smoother.

Controls the weighting of the falloff within the area defined by the seam tolerance. The graph represents the strength of the seam’s influence versus the distance from the seam.
The default shape of the curve specifies more influence close to the seam area and less influence at the outer edges of the Seam Tolerance. Areas with high seam influence are more resistant to moving away from the seam.
The shape of the curve can be manually adjusted by dragging existing points on it. You can add additional points by clicking the graph.


