Maya has a number of textures that you can map onto objects. For more information on these textures, see 2D and 3D textures.
To apply a texture to an object you map (connect) it to the attributes of an object’s material. (Textures and materials are render nodes. Render node attributes describe how the node appears and behaves; for more information, see Render nodes.) The attributes to which the texture is connected determines how the texture is used and therefore how it affects the final results.
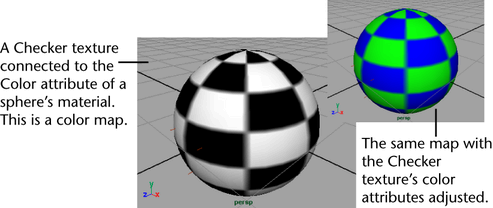
For example, if you connect Maya’s 2D black and white Checker texture to the color attribute of an object’s material, you have applied a color map; the checkered pattern determines which parts of the object appear black and which appear white (or other colors if you adjust the texture’s color attributes).
To map a texture, see Map a 2D or 3D texture.
If you connect the black and white Checker texture to the transparency attribute, you have applied a transparency map; the checkered pattern determines which parts of the object are opaque and which are transparent.
For a description of how textures stick to materials of objects, see Mapping methods.
To map a texture, see Map a 2D or 3D texture.
By mapping a texture to the Color attribute of an object’s material, you create a color map which describes the color of the object.
To learn more about how you can work with color in Maya, see Color .
By mapping a texture to the Transparency attribute of an object’s material, you create a transparency map which lets you make parts of an object opaque, semi-transparent, or entirely transparent.
To learn more about how you can work with transparency in Maya, see Transparency.
By mapping a texture to the Specular attribute of an object’s material, you create a specular map which lets you describe how shine appears on objects (by controlling highlight).
To learn more about how you can work with highlight in Maya, see Specular highlight (shine).
By mapping a texture to the Reflected Color attribute of an object’s material, you create a reflection map which lets you describe how an object reflects its surroundings.
To learn more about how you can work with reflection in Maya, see True reflections.
By mapping a texture to the Bump attribute of an object’s material, you create a bump map which lets you add the illusion of surface bump detail to a surface.
To learn more about bump maps in Maya, see Bump maps.
Displacement maps let you add true dimension to a surface at render time, a process which may reduce or eliminate the need for you to create complex models.
To learn more about how you can work with displacement maps, see Displacement maps.


