You can arrange your Work Area in the Hypershade in a more efficient manner by assembling nodes into logical node groupings using assets. For example, if you have a complex shading network that appears multiple times within your scene, you can group each network into an asset to obtain a simpler Work Area.
An asset is a special type of node that lets you simplify the display of nodes related to a particular item in the scene or lets you assemble multiple nodes for a special purpose.
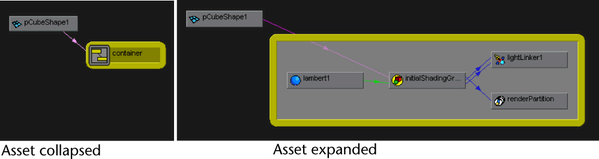
An asset is differentiated from other nodes in the Hypershade by its thick, round-cornered border outline.

Assets do not change the hierarchical (parent/child) relationships between nodes. You add and modify attributes and make attribute connections on assets just like you would other nodes in Maya. For more information see Create, edit, or delete custom attributes and Connect input and output attributes of the Basics Guide.
You select nodes within assets in exactly the same way you select other nodes in the Hypershade.
Assets can be created and removed using the Hypershade’s Edit menu or by using the icons on the Hypershade Toolbar.

You can expand or collapse the display of assets by double-clicking on the asset’s border or by using the icons in the Hypershade Toolbar. Expanding an asset lets you view the nodes contained within it. Collapsing an asset reduces the display of its contents so they appear as a single node in the graph display. Collapsing and expanding an asset does not affect its contents, nor does it affect the connections and attributes of the nodes inside the asset.
The background of an expanded asset is semi-transparent so you can see nodes that are behind it. Attribute connections in and out of assets are also visible.
To create an asset in the Hypershade
 icon in the Hypershade toolbar.
An asset is created in the Work Area of the Hypershade, and the selected nodes appear within it.
To remove an asset from the Hypershade
 icon in the Hypershade toolbar.
The selected asset is removed from the Work Area of the Hypershade. Any connections that existed for the removed asset are deleted in the process.
To collapse the display of the contents of an asset
 icon in the Hypershade toolbar.
The selected asset is minimized. It is approximately the size of a regular node.
To expand an asset to display its contents
 icon in the Hypershade toolbar.
The selected asset is expanded in size to display the nodes contained within it. The asset automatically resizes to contain its nodes.
To add or remove nodes from an asset
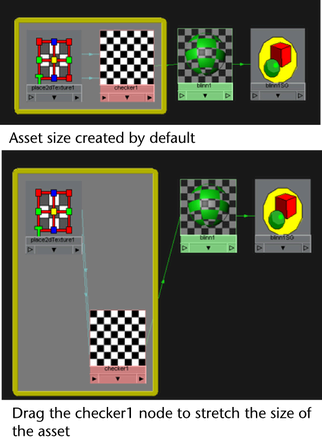
To modify the size of your asset