Show in Contents

Add to Favorites

Home: Autodesk Mudbox Online Help

Paint using layers

Paint using layers

Rename a paint layer

Create a new paint layer
Whenever you paint on a model, the paint is
applied to a layer. A layer relates to the actual 2D bitmap image you
are painting behind the scenes.
Paint layers are similar
to transparent pieces of acetate that let you keep separate paint
on one layer from another. As more paint layers are created, they
are stacked on top of each other to produce the final result.
You must have at least
one paint layer created and selected to be able to paint on a model.
The first time you paint on a model without any paint layers, the Create
New Paint Layer window automatically appears to let you
create one.
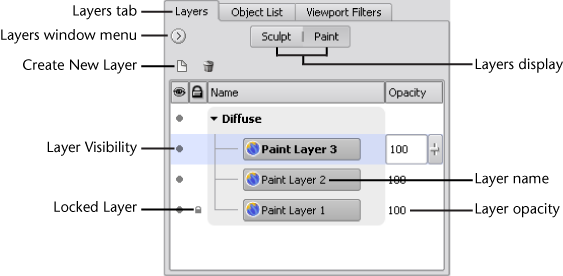
Paint layers are managed
through the Layers window, by selecting
the Paint display button.
You
can create additional/multiple paint layers using the Layers option
menu:
- From the Layers window menu
(
 ), select New
Layer or click the New Layer icon
at the top of the window.
), select New
Layer or click the New Layer icon
at the top of the window.
The Create
New Paint Layer window appears.
NoteRight-clicking in
the
Layers window also displays
the contents of the
Layers window menu (
).
- In the Create New Paint Layer window,
do the following, and then click OK:
- Name: Type
a name for the layer. For example, a name related to the texture’s
purpose.
- Size: Select
the size (resolution) for the image by selecting a number that represents
the number of pixels along X and Y for the image (square aspect
ratio - 256, 512, 1024, 2048 (default), 4096). The larger the image,
the finer and sharper the detail you’ll be able to apply when painting.
- Save As:
Specify the image file format and bit depth (8, 16, 32) for the
image you are going to paint. For a list of supported image formats,
see
Image file formats.
The higher the bit depth, the smoother the blending of colors will
be in the image. Higher bit depth images can sustain color and contrast
adjustments with less degradation in quality compared to low bit
depth images.
- Channel:
Specifies which paint channel to apply the paint and how it appears
on the model as a result. For example, If you want the paint to
appear as the diffuse base color of the model, select Diffuse (default).
If you want to produce a more tactile appearing texture that renders
as embossed-like or in relief, select Bump Value.