Show in Contents

Add to Favorites

Home: Autodesk Mudbox Online Help

Lock a model

Sculpting

Sculpt using stamps

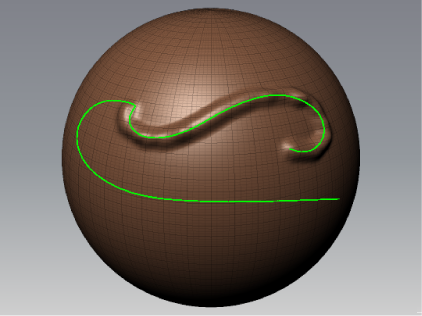
Sculpt using curve guides
Curves can be used to create controlled
strokes when you sculpt on a model by acting as two-dimensional
guides for your sculpt and paint strokes.
Curves are useful for
creating features such as ridges on armor, hair-like strokes for
hair, or for adding details on hard inorganic-shaped models.
Curves can also be used
to achieve an even tool stamp effect along a path by using the Stroke
On Curve feature.
NoteCurves appear on
a 2D plane that is fixed to the camera view. As you tumble, dolly,
or track the camera, any existing curves appear fixed in the camera view.
For more information on repositioning curves in relation to the
camera plane, see
Move, rotate, or scale a curve guide.
Create a curve guide
Do
either of the following:
- Use existing curve by selecting Create
> Curves. Choose one of the preset curves from the
menu (for example: Circle, French
Curve,Square, or Straight
Line).
- Construct your own curve by placing points
as follows:
- Select Curves > Create Curve.
(Hotkey: Ctrl + C)
- Click in the 3D View to
place points.
- To complete a curve, select Curves
> End Curve or press Enter.
- To join the end of a curve to its start
point, select Curves > Close Curve.
Hide and show curve guides
Do any of the following:
- In the Object List, click
the visibility icon (eye) beside a curve to turn off its display.
Click the visibility icon location again to display the curve guide.
- Select Display > Hide All
Curves. Select Display > Show All to
show the curve again.
- Press Ctrl + H (Windows) or
Command + Shift + H (Mac OS X) to hide all curves
in the 3D View. Press U to show all.
Delete a curve guide
- Right-click the curve in the Object
List then select Delete from
the menu that appears.
Snap to a curve guide
Sculpting tools snap
to a curve whenever the tool is close to a curve or over the model.
Add points to a curve guide
- Select
the curve in the Object List to make it editable,
then do one of the following:
- Click an empty area within the 3D
View to adds points to the selected curve.
- Click in the 3D View on
an existing point of a curve to select and drag it to another position.
- To exit editing mode and return to sculpting,
press Enter.
Move, rotate, or scale
a curve guide
The controls
for moving curves in the 3D View are
similar to the camera controls, only you press C instead of Alt.
To:
|
Keyboard shortcut: (Windows):
|
Keyboard shortcut: (Mac OS X)
|
Action/Results
|
| Create a curve |
Ctrl + C |
Command + C |
Activates curve creation mode. Click in the 3D View to
place points for the curve.
|
| End a Curve |
Enter |
Return |
Completes the curve and exits curve editing mode. |
| Rotate a curve |
C + left button |
C + left button |
Press the C key while dragging the mouse/stylus and
pressing the left button. The curve rotates about its center.
|
| Translate a curve |
C + middle button |
C + middle button |
Press the C key while dragging the mouse/stylus and
pressing the middle button. The curve moves across the 3D
View.
|
| Scale a curve |
C + right button |
C + right button |
Press the C key while dragging the mouse/stylus and
pressing the right button. The curve increases or decreases in size.
|
Apply a repeating stamp
effect using a curve guide
You can sculpt a repeating
stamp effect using the Stroke On Curve feature. Stroke
On Curve is useful when you want an evenly applied stroke
or an evenly repeated stamp effect along a path you define using
a curve. For example, the simulation of rivets along the edge of
a surface, or stitching along the edge of a chair.
- Select a Sculpt tool you want stamped
repeatedly along a curve path and adjust its Sculpt properties in
the Properties window.
- Construct a curve to guide your sculpt
stroke.
- Select the curve from the Object
List.
- Select Curves > Stroke On
Curve. (Hotkey: Shift + C)
- Set the Equal Spacing and Number
of Stamps options then click OK.
NoteFor a curve to be
used with Stroke On Curve, its start
point must be over the model.
TipYou can create curves
and save them as a .mud file so they appear in the Create
> Curves menu the next time you launch Mudbox. Save
them to: (Windows) <drive>:\Program
Files\Autodesk\Mudbox 2009\Mudbox\curves (Mac
OS X) /Users/<username>/Library/Application
Support/Autodesk/Mudbox 2009/Curves.