The Lens Blur tool let you simulate rack defocus and add photographic effects to 3D rendered scenes or live footage. You can also create lens flares, streak lines, and halos around bright lights and reflections.
The Lens Blur UI is composed of four tabs: Lens Blur, Modulation, Output, and Masking.

The Lens Blur tab consists of a set of parameters for setting the main blur effect, as well as controls to create bloom, flares, and halos.
To create the main blur effect, use the controls on the left side of the UI.

| Use: | To: |
|---|---|
| X Radius | Set the amount of blur to apply in the direction of the X axis. |
| Y Radius | Set the amount of blur to apply in the direction of the Y axis. |
| Link | When enabled, changing the X Radius or the Y Radius causes the other one to change in the same proportion. |
| Aberration | Set the aberration. Setting the aberration parameter to greater than 0 will make the radius different for each of the three color planes, introducing color fringes. |
| Radial Aberration | Set the radial aberration. Setting the radial aberration greater than 0 will scale the image about the center differently for each color plane, producing color fringes that are offset radially, simulating transverse aberration. |
| Aperture Shape | Select either regular polygon shapes or ellipses. |
| Number Sides | Set the number of sides of the polygon blur shape. |
| Rotation | Set the rotation of the shape (in degrees). |
| Softness | Extend the blur outward from the edge of the polygon with an exponential falloff curve. Softness is specified as a distance (the same as the radius). |
| Antialias | Turn on and off the higher quality rendering of the polygon/ellipse blur. |
The following images show the types of effects you can generate using the main blur controls.

Input image (some single pixels not visible)
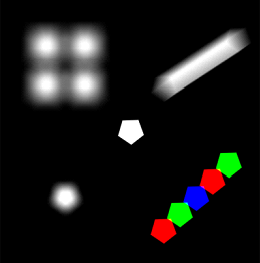
Pentagon blur with softness set at 2 pixels

Pentagon blur with softness set to 20 pixels

Pentagon blur with aberration

Radial chromatic aberration
The Bloom controls let you remap the higher luminance range to increase the bloom appearance of the blur. This is especially useful for 8-bit images which cannot represent values greater than 1. With bloom, you can remap the values to make it seem like an HDR image, giving you more realistic blooms around bright light sources and reflections.

Original image
The Flares parameters let you add lines and streaks emanating from bright lights and reflections. You can set the intensity of the flares, as well as the number of flares. An intensity of 0 (the default) will disable flare generation. The rotation of the lines can be animated to simulate flares that seem to rotate as the camera moves relative to the light sources. The Randomness parameter controls how evenly distributed the lines are. A value of 0 makes the flare lines uniformly distributed around a circle, while a value of 1 makes them completely randomly distributed. You can also set a seed value to choose a particular sequence of lines. The effect of adding flares will be somewhat like the linear patterns in the right image below.

Original image
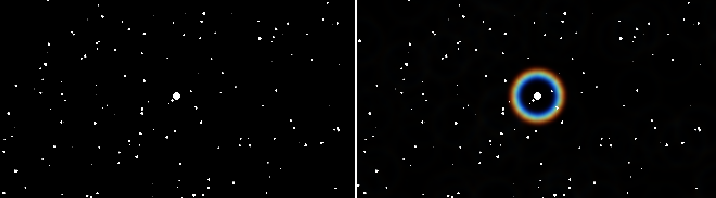
The halo is a ring of brightness of a specified radius from the center of bright lights, and with a specified width. If the radii differ among the color channels, the effect is a rainbow halo like in the following right image. This is controlled by the Aberration parameter. There is also an intensity parameter to adjust the strength of the halo; the default value of 0 disables the halo creation.
The Grating is a set of lines of random intensity, uniformly distributed around the circle. Increasing the Grating Density parameter increases the number of lines, and the smoother it appears.
Original image

The Modulation tab looks just like that of the Blur, including the extrapolation (extending) capability—see Modulation Blur. You can choose what channel of the modulation image is used and apply an offset to the modulation image. The modulation can affect the X and Y radius, or the rotation of the polygonal or ellipse shape.

The Output tab is the same as that of the Blur tool, but without the Min Radius parameter—see Output Controls.


