By default, a camera exists in the Action scene (you may need to pan in the schematic to see the camera node). You can add multiple cameras in order to change point of view or depth of field from one camera to another. Add and animate multiple cameras when creating compositions. You can also switch from one camera to another at any point.
A new camera is added to the scene. An icon representing the camera is added to the schematic.


The result camera always appears as the first tab on the right side of the Object menu. To allow you to easily access the camera without losing your place in the scene, this special camera tab (appearing in orange) does not follow the tab population rules. If a camera node is selected in the schematic, the special Camera tab does not appear, and the normal tab population rules apply.
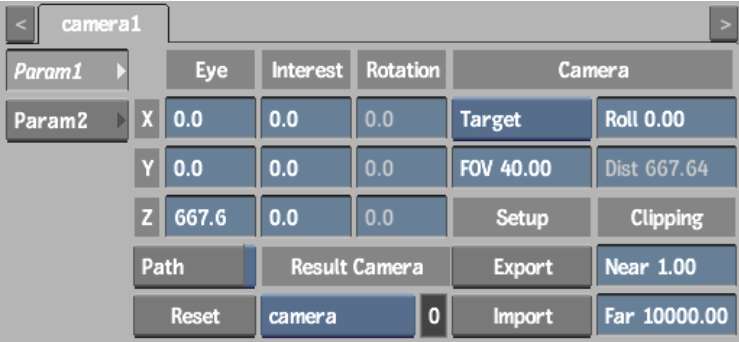
The Camera controls are described as follows.
Camera Eye X, Y, and Z fieldsSpecify the position of the camera eye on the horizontal, vertical, and perpendicular (X, Y, and Z) axes.
Motion Path buttonAnimates the camera eye on a motion path. See Moving the Camera Eye and Point of Interest.
Camera point of interest X, Y, and Z fieldsSpecify the position of the point of interest on the horizontal, vertical, and perpendicular (X, Y, and Z) axes.
Camera Rotation X, Y, and Z fieldsRotate the camera on the horizontal, vertical, and perpendicular (X, Y, and Z) axes.
Camera Type boxProvides Free and Target Camera options.
Free Camera views the scene in the direction that you aim the camera. Free cameras are easy to use because you do not have to manipulate the point of interest. You can simply animate the camera rotation or camera tilt as though it were on a tripod. Use the Distance field in conjunction with Free Camera.
Target Camera ensures the camera is specifically aimed at a target object in the scene because you specify the point of interest. Use the Roll field in conjunction with Target Camera.
Roll fieldSets the amount of camera roll. This field is available with the Target Camera.
Field of View fieldSpecifies the camera field of view, measured in degrees.
Distance fieldSpecifies where the camera's focus is.
Near and Far fieldsSpecify the position of the near and far clipping planes. See Moving the Clipping Planes.
Export Camera buttonExports camera path information from Action to 3ds Max format.
Exported data includes Eye X, Y, and Z; Poi X, Y, and Z; Fov; Roll, Target or Free Camera; motion path and explicit keyframe camera animation. See Importing and Exporting Cameras.
Import Camera buttonImports 3ds Max camera path information. Select the camera path file that contains the data you want. See Importing and Exporting Cameras.
Result Camera boxSpecify which camera is active. The active camera is the one that will be used when processing/rendering your scene. The field displays the active camera number. A value of 0 indicates that you are viewing the scene through the default camera.
Reset Camera buttonResets the Camera menu to its default settings.
Parenting Offset boxSelect Origin or Target. When parenting a camera node, the image offset gets reset to the camera origin, which is not always the desired viewing option. Setting Parenting Offset to Target restores the image to the default viewplane distance relative to the camera. The offset value is computed from the default camera field of view and the default image size, and does not change even if other camera parameters are changed. This value is displayed in the Parenting Offset field.


