Use the Batch Setup menu to enable Batch log files, set timeline, schematic, and undo properties, and manage caching of rendered frames.


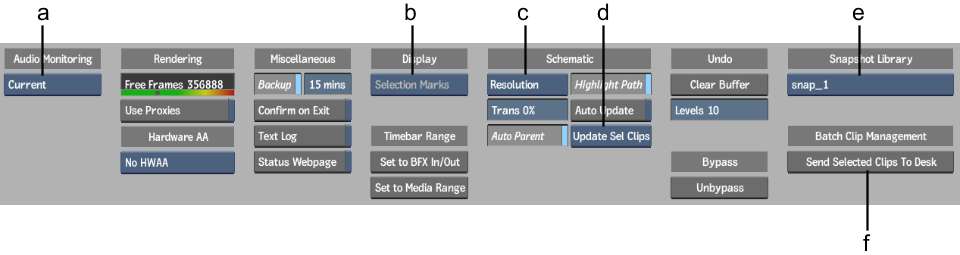
(a) Batch Audio Source box (b) Selection Marks box (c) Clip Info box (d) Update Clip box (e) Snapshot Library box (f) Send Selected Clips to Desk button
The Batch Setup controls are described as follows.
Batch Audio Source boxSelect the audio context you want to hear when working with another clip.
Use ProxiesReplaces clips with proxies when working in Batch and all associated modules. When enabled, the image window is outlined in amber. See Using Proxies in Batch.
Hardware Anti-aliasing Sample boxSelect a hardware anti-aliasing sampling level to accelerate edge anti-aliasing with no performance penalty. The graphics hardware automatically renders the image at full speed with approximately the equivalent of up to 32 samples of anti-aliasing (depending on your graphics card and project graphic bit depth). Hardware anti-aliasing also gives anti-aliasing during normal interaction instead of only while rendering.
Backup button and fieldCreate a backup copy of your current Batch setup automatically. When enabled, a backup copy of the current setup is saved in the _session.batch file in the batch directory.
In the Backup Frequency field, set the number of minutes between backups.
Confirm on Exit buttonPrompts for a confirmation before exiting Batch.
Text Log buttonSaves Batch processing status information in a text file called batch_log. These files are located in /usr/discreet/project/<project home>/batch/log.
Information is appended on a continuous basis to this file and serves as a permanent log file as long as Text Log is enabled.
Selection Marks boxDisplays the cue marks and in and out points of either the selected clip, source clip only, or record clip only. Source and record clips must be set for the options in this box to be active. See Setting Record and Source Clips.
Set to BFX In/Out buttonIn the timebar, displays frames as defined by the in and out points set on the clip’s timeline one level up.
Set to Media Range buttonIn the timebar, displays the head and tail frames brought in from the clip’s timeline one level up.
Clip Info boxDisplay resolution, framerate, size, or any combination of clip information in the schematic.
Transparency fieldSets the transparency of currently unselected nodes in the schematic.
Auto ParentEnables the Parent and Cut options in the schematic while using the Move edit mode.
Highlight Path buttonHighlights the path of the currently selected node in the schematic.
Auto Update buttonUpdates a node's result proxy automatically. When you change the current frame, the result proxies are updated for all clips or selected clips, depending on what is defined in the Update Clip box.
Update Clip boxDefines whether you interactively update all clips or only selected clips in Batch. Update Sel Clips increases performance.
Clear Buffer buttonClears the Undo buffer of all previous undo operations.
Undo Levels fieldSets an upper limit for the number of undo or redo operations, which applies throughout the Batch module, including tasks performed in the schematic. Tasks completed with the various nodes in Batch also support multiple undo and redo operations.
Unbypass buttonDisables node bypassing for selected nodes in the current Batch setup.
Snapshot Library boxSelect the library to which you want clips associated with Batch setups saved. See Saving Sources and Setups.
Send Selected Clips To Library buttonCopies selected clips to the Snapshot library.
Send Selected Clips To Desk buttonCopies clips to the EditDesk. See Managing Clips in a BFX Level.


