Use the Reposition tools to reframe your shots. Generally, when you reframe a shot, you are adjusting the viewable area of your frames within a specified smaller area.
In a stereoscopic project, you may want to reposition images to realign shots for the Left Eye and Right Eye so that they converge correctly. See Repositioning the Left Eye and Right Eye.
For example, if you are shooting in a widescreen film format and you intend to project the finished film on a television, you have to make certain decisions about how to deliver the content. You can scale and letterbox the film frames, or you can reposition the images in such a way that the important subjects of the scene are visible on screen (at the expense of “unimportant” elements).
If you shot your film in 35mm, but you want to show it in a widescreen format, you will need to crop the frames and adjust the racking—or the vertical positioning—of the image to modify the image's composition.
With letterbox images, you are scaling down a widescreen frame to fit horizontally on a television screen. This process adds black bars across the top and bottom of the screen and reduces the size of the images. However, letterboxing has the advantage of showing the entire image, thus remaining true to the vision of the artists.


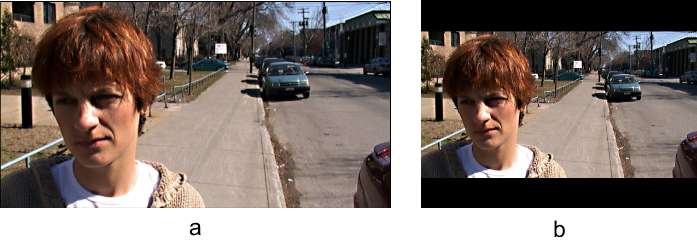
(a) Original widescreen frame (b) Letterboxed frame
When you reposition frames, the actual source images are larger than the viewable area. To compensate, you make adjustments to the pan and scan of the frames to emphasize the key elements of a scene. For example, if the original frames show two people facing each other and talking, you may pan back and forth to see the person who is talking. The other person would then be partially or even completely off screen.

(a) Original widescreen frame (b) Cropped and repositioned frame (c) Final frame
Use racking when you want to deliver your footage in a wider format than it was shot in. For example, when shooting on 35mm film, you may compose the scene so that the important elements of the image are contained in a narrow horizontal portion of the frame. In such a case, you set a cropping gate, and then adjust the vertical position (scan) of the shot in order to compose the scene as needed.

(a) Original 35mm with racking on (b) Cropped frame
Use the Reposition tools to animate the position, rotation, scaling, and aspect ratio of your shots. Do this, for example, to simulate camera movement, which is useful when you want to make a still shot more dynamic.
You can also use racking and repositioning in conjunction with tracking to stabilize shots with too much motion.
Finally, you can modify shot composition by flipping the shots vertically or flopping them horizontally.
For control surface mappings, see the section that addresses repositioning shots in The Autodesk Control Surface, or in The Tangent CP100 Control Surface.


