You can use the Track Geom button
to animate the shape of a geometry when using Point Tracker. When
you animate the shape of a geometry, the vertices of the geometry
change position as the moving elements in the shot are tracked.
When you use Track Geom,
a Point Tracker is simultaneously assigned to each vertex in the
current geometry. You then analyse the shot to generate the tracking
data.
To animate the shape of a geometry:
- If working with a basic shape, right-click
it in the Player to convert it to a free-form geometry.
- In the Secondaries menu, activate the
secondary layer button that contains the geometry you want to track.
- Enable Show.
The geometries are displayed
in the Player.
- Go to the frame where you want to start
tracking.
- Select the geometry you want to track.
In the Player, draw a selection box around the geometry to select
all vertices on the shape. Alternatively, click a vertex to select
it.
- Click Track Geom.
NoteWhen the Diamond
Keyer is selected, disable the Show button (beneath the Source Primary
button) to display the Tracker panel.
In the Player, a Point
Tracker is assigned to, and positioned over, each vertex on the
shape. A tracker number is assigned to each tracker. Gang mode is
selected and the Point Trackers are turned on.
When a Point Tracker
is on, it is displayed in the Player and can be analysed. When Gang
mode is selected, all Point Trackers assigned to the geometry (and
any others included in the gang) will be analysed simultaneously.
NoteIf other Point Trackers
exist, they will be turned off and hidden so as not to be included
in the gang. However, if they are assigned to another geometry,
their tracking data will still be applied.
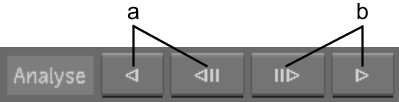
- Use the Analyse buttons to analyse the
shot:
- To track the tracking point forward in
time, click the Analyse Forward button.
- To track the tracking point backward
in time, click the Analyse Backward button.
The system analyses the
shot and generates the tracking data.
- If the Point Tracker loses the tracking
point, click the image to stop the process, and then use the Step
Backward or Step Forward button in the Player controls (or press
the right Alt or right Ctrl key, respectively) to return
to the last frame that was correctly tracked.
- In the Player, do any of the following:
- To resize the tracker, modify the Match
area (magenta rectangle) and Search area (yellow rectangle) by dragging
the vertices of the rectangles.
- To reposition the Point Tracker, drag
the centre point of the tracker.
- To reposition the Point Tracker and reference
point, middle-click and drag the centre point of the tracker.
TipYou can reposition
the Point Tracker and reference point when the reference point moves
off-screen.
- Continue using the Analyse buttons to
analyse the shot.
- To manually add or reposition a tracking
point, go to the frame where you want to modify the tracking data,
enable Add Key, and then click a tracking point in the image.
The position of the tracking
point is displayed in the image.
- To manually delete the position of a
tracking point, go to the frame where you want to remove the tracking
data, and then click Del Key or press Backspace.
The tracking data is
deleted.
NoteLinear interpolation
is used to set the tracking position for frames without tracking
data. For these frames, the previous defined tracking position and
the next defined position are used to interpolate the tracking position.