Mixing Source Clips


You can generate a new clip from two source clips using the Mix menu. Each frame in the generated clip is the result of mixing an image in a frame of the first source clip with an image in the corresponding frame of the second source clip. You specify how the pixels of the source clips are combined to produce the corresponding pixels of the new clip.

To access the Mix menu:

  1. Click Dissolve in the Editing menu.
  2. Select Mix from the Dissolve Type box.

    The Mix options appears.

    Show small imageShow large image

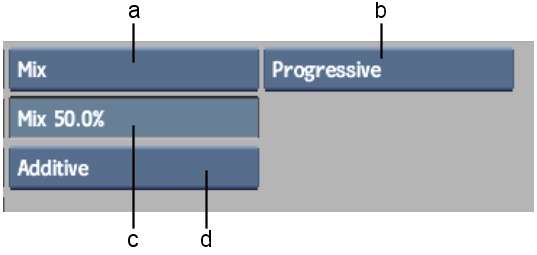
    (a) Dissolve Type box  (b) Render Type box  (c) Mix Percentage field  (d) Mix Mode box  

Setting the Mix Percentage

The Mix Percentage value specifies how much of each clip will be used in the mix. For example, if the Mix Percentage is set to 80%, the resulting mix will contain 80% of the first source clip and 20% of the second source clip. If the Mix Percentage is set to 50%, the result clip will contain 50% of each source clip.

Show small imageShow large image

Action: Select the first source clip

Show small imageShow large image

Action: Select the second source clip

Show small imageShow large image

Result: The result clip contains 50% of each source clip

To create a clip that is a mix of two source clips:

  1. Select Mix from the Dissolve Type box.
  2. Enter a value in the Mix Percentage field.
  3. From the Mix Mode box, select a mix mode.
  4. Select the first source clip.
  5. Select the second source clip.
  6. Select the destination reel.

    The mixed clip appears on the destination reel.

Modifying the Mix Percentage

You can modify the mix percentage across the length of the clip using the Mix Editor. For example, instead of having the same mix percentage across all frames in the clip, the mix percentage can be 50% in frames 1 through 5, 75% in frames 6 through 10, and 25% in frames 11 through 15.

To access the Mix Editor:

  1. Select Mix from the Dissolve Type box.
  2. Select the first and second source clips.

    An “E” (for Editor) appears on the Dissolve button.

  3. Click Dissolve.

    The “E” on the Dissolve button is highlighted.

  4. Select a destination reel.

    The Mix Editor appears.

    Show small imageShow large image

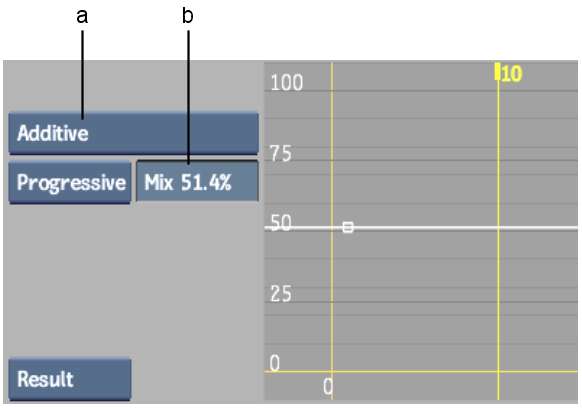
    (a) Mix Mode box  (b) Mix Percentage field    

    The graph plots the frame number (on the horizontal axis) against the mix percentage (on the vertical axis). The default curve is a straight line, indicating that the mix percentage is the same (50%) in all frames of the clip.

To change the mix percentage in one or more frames of the clip:

  1. Display the frame that you want to edit in the image window. This will allow you to see the result of changing the mix percentage value for that frame.
  2. Select Add from the Edit Mode box.
  3. Add a point on the curve for the frame that you want to edit.
  4. Select Move from the Edit Mode box.
  5. Move the new point up or down to the required mix percentage value.
  6. Continue to add, move, or delete points on the curve until you achieve the required result.
  7. Select processing in frames or fields from the Render Type box.
  8. To load or save mix curves, see Saving, Loading, and Deleting Items.
  9. Go to frame 1.
  10. Click Process to process the clip. When you are finished editing and processing the clip, click Exit to return to the Desktop reels.