When working with source nodes, you can replace the media's front and matte clips with the front, matte, or a combination of the front and matte clips from other media. These changes can be made in the Source menu, or from the Sources tab in the Object Image menu of the image attached to the source node.
To replace the media's front or matte:


| Select: | To: |
|---|---|
| Front only | Set the source to use only the front of the selected surface; the matte will be replaced with white (displayed as FW under the selected surface in the schematic). |
| Matte only | Set the source to use only the matte of the selected surface; the front will be replaced with white (displayed as WM under the selected surface in the schematic). |
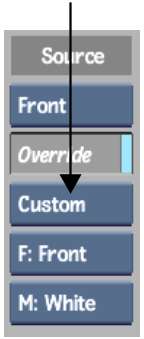
| Custom | Set the source to have all the options of replacing the front and the matte of the selected surface by White, original Front or original Matte. |
You can also change the source type in the Object Image menu for an image parented by a source node. The source type set in the Object Image menu is independent of the source type set in the Source menu for the parent source node or nodes.
For example, if you select F: Matte and M: Matte, only the matte of the source's child image is rendered and used. A summary of your choice can be seen under the image node in the schematic. In this case you will see (MM).


