Stabilizing a Clip from Action


You can import stabilizing data to lock the position of an axis in relation to a reference point on the front clip. This means that any movement in the front clip is matched by the axis. You can enter the Stabilizer from Action to stabilize an image so that the axis changes to keep the reference point fixed against the background.

To stabilize a clip from Action:

  1. Load the clips into the Action module.

    When selecting clips, keep in mind that the front clip is the image that you want to stabilize and the back clip contains the reference point you want to track. Also, the clips must be of the same resolution.

  2. In the Axis menu for the selected media, make sure that the motion path is disabled (Path button).

    Show small imageShow large image

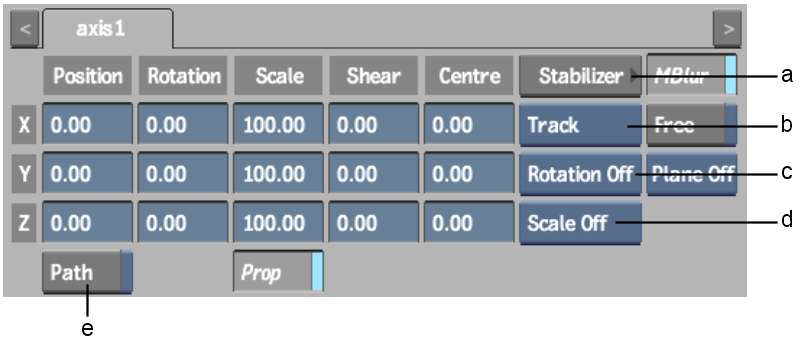
    (a)  Stabilizer button  (b) Stabilizer Option box  (c) Tracking Rotation Option box  (d) Tracking Scale Option box  (e) Motion Path button  

    NoteDo not move the axis from its default position at the centre of the image window before entering the Stabilizer, or else the tracking data will be overwritten. Use the offset axis to add an offset to the tracker movement instead.
  3. In the Stabilizer Option box, select Stabilize and click the Stabilizer button.

    The front clip is automatically loaded into the Stabilizer and the Stabilizer menu appears.

  4. In the Stabilizer, position Tracker1 over the reference point that you want to track.
  5. To help you view your tracking result without any objects blocking the view, enable the Context button. While similar to a result view, the context view allows you to see all of the Action scene, except for the selected node (and any children of the selected node).

    Show small imageShow large image

  6. Depending on the performance of your system and the complexity of your Action setup, you can enable Linetest in the setup menu to display the context view at a lower resolution.

    Show small imageShow large image

    When you play the clip in Action context, you can see the front image follow the inverse movement of the reference point in the front clip.

  7. Click Analyse to generate the translation data.
  8. Once the analysis is complete, make sure that Tracker1 is still active, and click Return.

    When you exit the Stabilizer, the X and Y Shift values for the reference position are automatically copied into the X and Y translation channels for the selected axis in the Action module.