A number of 3d text presets are included
in Action, such as rotating or fading text to add to your scene.
These presets can help you add complex text effects with just a few
clicks.
To add a 3d text preset:
- Do one of the following:
- Drag the Presets node from the node bin
and place it in the schematic.
- Drag the Presets node from the node bin
and place it where you want it in Result view.
- Double-click the Presets node. You do
not need to be in Schematic view to add a node in this manner.
The
file browser opens.
- From the Preset Type
box, select 3D Text.
The 3D Text Preset file
browser appears, pointing to the default location of the presets: usr/discreet/<product home>/3d_text_presets.
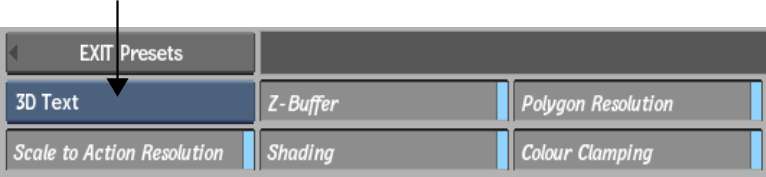
- Optional: Enable Scale to Action Resolution
to load the preset in the current Action resolution.
- Optional: Select which rendering settings
to enable or disable in the preset (Z-Buffer, Shading, Polygon Resolution,
and Colour Clamping).
NoteThese settings are
enabled by default, and by disabling any of them, you may not see
the intended results in the preset.
- Navigate through the subfolders and select
the 3d text preset you want to load. Hold Ctrl and
click to select multiple presets.
TipSwitch to Proxies
view to see a visual representation of the presets.
- Click Load.
The 3d text preset is
then appended to your Action scene. In the 3D Text menu, you
can change the default text string of the preset.
For a listing and description
of all available 3d text presets, see
3D Text Presets.