


Editing Timewarps with
the Channel Editor
Using the Channel Editor, you can:
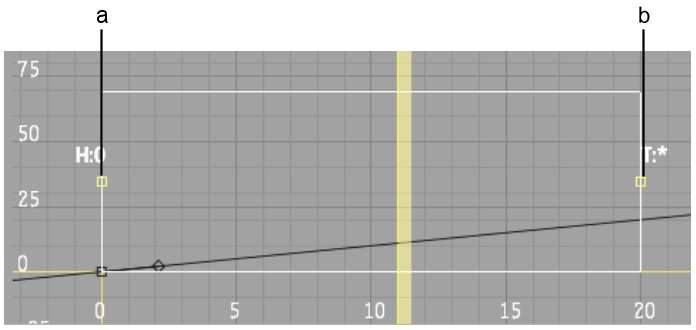
The speed and timing curves are shown in the Channel Editor of the Timewarp Editor.


(a) Speed curve (b) Timing curve
For the timing curve, the source clip frame number is mapped along the X, or horizontal, axis. The range is from 0 at the origin to the total number of frames at the top of the graph. You cannot add frames to the source clip in the Channel Editor.
The result clip frame number is mapped along the Y, or vertical, axis. The range is from 0 at the origin to the total number of frames at the right of the graph. You can add frames to the trail of the timewarp.
Speed Curves and Timing Curves
Timewarps are created by modifying the timing of the source clip or by changing the playback speed of the source clip. When you change a clip's timing, you are essentially changing the time that it takes for a clip to reach a given frame. For example, in a 100-frame clip, you could adjust the timing so that only the 50th source frame is reached by the end of the clip's 100 frames. This effectively halves the clip's playback rate. A negative playback rate can be achieved by reversing a clip's timing curve (by changing the value at the last keyframe to the value of the first keyframe and the other way around).
A steeper timing curve results in a faster playback rate.
Adjusting the clip's speed has a different result. Setting the speed to 200% doubles the playback rate. A speed value of 50% plays the clip at half speed (or in slow motion). A negative speed value corresponds to playing the clip in reverse (where a -100% speed value creates a clip that plays back at the normal rate, but backward).
In the Channel Editor, notice that the speed curve and timing curve are, by definition, dependent on each other. You cannot change the speed without affecting the timing. Any action performed on one curve results in a corresponding action on the other. If you add a keyframe to the speed curve, a keyframe is automatically added to the timing curve at the same frame.
Changing the Timing of a Timewarp
Edit the timing curve to adjust the timing of the timewarp. You can adjust the speed of the timewarp independently of its duration. For example, if you are satisfied with the duration of your edit and want to modify the speed of an element without changing the overall duration of your clip, adjust the timing curve without changing the position of the first and last keyframes. It is recommended to adjust either the timing curve or the speed curve for a given timewarp. It can be difficult to control the result when keyframing both curves.
The timewarp speed updates
dynamically as you edit. Use the positioner to scrub the timewarp
and see the results of your edits or click the  button in the playback controls.
Creating Variable Speed Timewarps
Variable speed timewarps contain animated speed and timing channels. You can create custom timewarp effects by adding and modifying keyframes for the timewarp.
To create a timewarp with a variable playback rate:
The Speed channel in the Timewarp Editor is automatically selected.
The timeline appears with the timewarp selected. The variable timewarp is identified in the timeline by a “*” in place of the segment's head and tail information.
 button to view the timewarp
effect.
button to view the timewarp
effect.
Trim timewarps to change their length. This is useful if you change the speed of a timewarp and want a different length, in frame, or out frame.
You can trim timewarps in the timeline or in the Timewarp Editor. The Trim button in the Timewarp Editor is the same Trim button as in the Timeline menu. Its on or off state is carried over from one menu to the other, and it must be enabled to trim in either location.
Trimming timewarps is the same as trimming any element. If you cannot trim all the repeating frames out of a timewarp that has been reset, it is likely due to a Ripple setting constraint. Change the Ripple setting, if necessary, to trim out the unwanted frames.
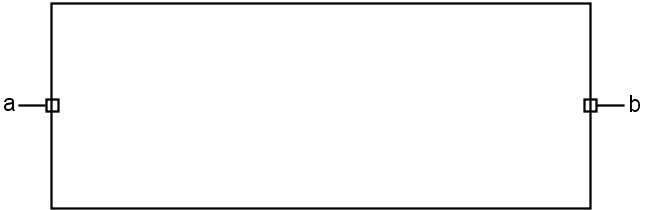
The Channel Editor also contains a Trim box for trimming timewarps.
(a) Trim box in point (b) Trim box out point
The left and right borders of the Trim box represent the in point and the out point of the segment being timewarped. Head and tail frames appear outside the box.
Use the Trim box handles to trim the timewarp.
(a) Rec In handle (b) Rec Out handle
Use the Trim Lock box to determine the effect of trimming in the timeline and in the Timewarp Editor.
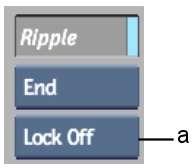
(a) Trim Lock box
| Select: | To: |
|---|---|
| Lock Off | Trim the in point or out point of the timewarp without locking any frames in position. |
| Lock One | Lock the frame on the current in point or out point when trimming a timewarp. |
| Lock Both | Lock the frames on both transitions when trimming the in point or out point of the timewarp. This is useful for changing the speed and duration of a timewarp while respecting the in point and out point. |
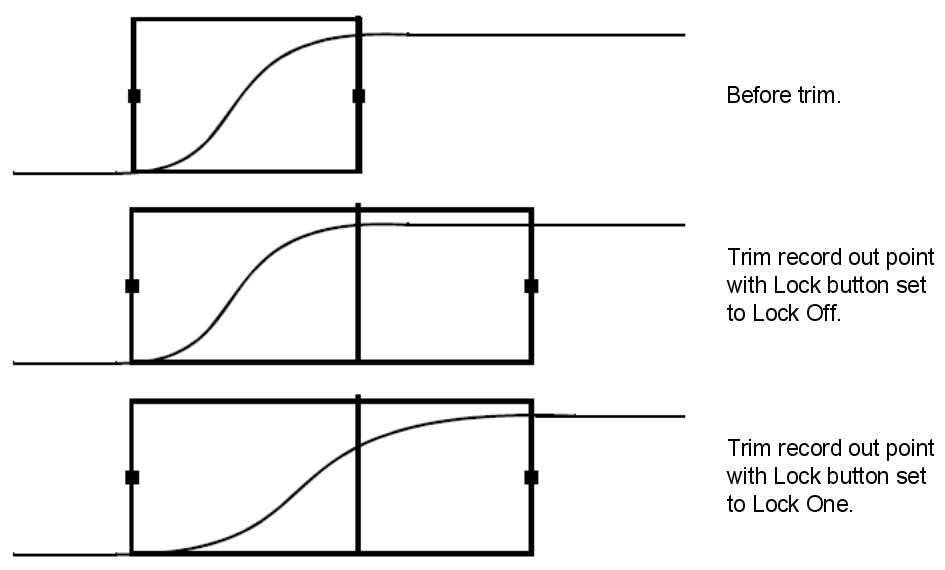
The following diagram shows the effect of trimming a timewarp's out point when the curve is locked and unlocked (using Lock).
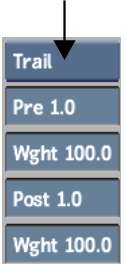
You can add a trail to the image that precedes and/or follows the moving object:
The number of frames used in the mix is set with the pre trail and post trail timing curves. Since you can change the shape of the timing curves, the Trail values can be varied in the clip. When you use a pre trail or a post trail, the mix value is not used.
Setting the Fall-off for the Trail
The Weight field specifies the fall-off for the image trail. The Pre and Post field each have one Weight field.
To add a constant pre trail or a post trail:
To add an animated pre trail or post trail to a segment:
Curves for the pre trail and/or post trail appear for channels where a value was set.
 button in the image window
to preview the result of applying the trail curve to the source
clip.
button in the image window
to preview the result of applying the trail curve to the source
clip.