You can lock clips saved to the Desktop to prevent the Batch setups from being accidentally deleted. All Batch clips saved to the Desktop have a magenta outline. In addition, the frame number on locked clips appears in magenta.
Each time you exit a Batch session after having edited a clip, a number appears on the clip to help you keep track of versions. If the modified clip was saved to the Desktop, the version number on the clip increments by one. If a copy of the modified clip was saved to the Desktop, the number on each copy reflects the version.
To save a clip to the Desktop:


| Select: | To save: |
|---|---|
| Modify Desktop Clip | The modified clip to the Desktop. |
| Create Clip Copy for Edit | A copy of the modified clip to the Desktop. |
The soft clip is saved to the Desktop. A magenta outline indicates it is a Batch soft clip.
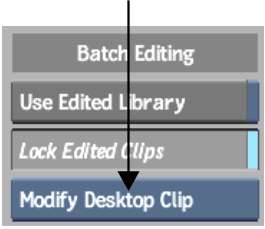
In the following example, the Modify Desktop Clip preference was selected. The clip was edited in five separate Batch sessions. Only the most recently modified clip appears on the Desktop.
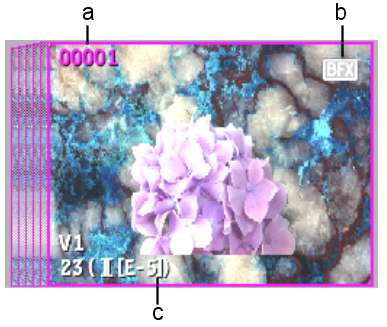
(a) Magenta frame number indicates locked clip (b) Modified soft clip with Batch FX (c) Version number of edited clip
To continue editing the Batch setup, load the soft clip into Batch. When you exit back to the Desktop, the newly modified clip replaces the one that was there previously, and its version number increments to 6.
In the following example, the clip was edited in six separate Batch sessions. The Create Clip Copy for Edit preference was selected. Each modified clip appears on the Desktop with its version number.
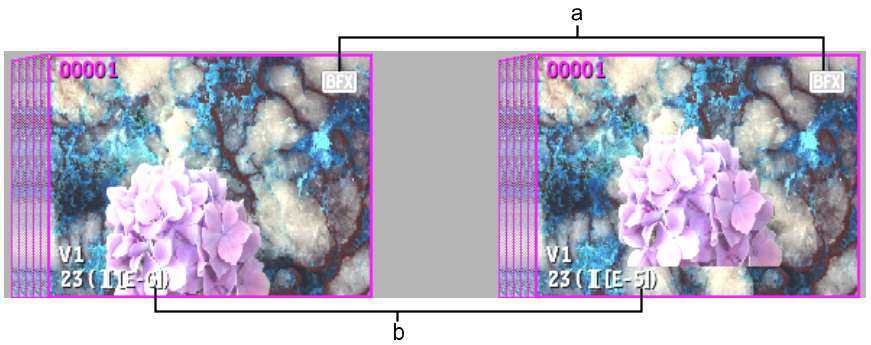
(a) Modified soft clips with Batch FX (b) Version numbers of last two edited clips
To continue editing the Batch setup, load one of the soft clips into Batch. When you exit back to the Desktop, a copy of the modified copy appears with a magenta outline and its version number increases by one.
To unlock an edited clip saved to the Desktop:

The frame number turns white indicating the clip is unlocked.
If you saved a Batch setup with the Modify Desktop Clip preference enabled, you have two options when loading the setup. You can have Batch load any clip with the same name if it cannot find the modified clip. Or, you can have only the identical clip loaded.
The default preference is for Batch to look for any clip of the same name. To have only identical clips loaded with the setup, disable Search [E] Clips by Name in the Batch Editing section of the Preferences General menu.
With this preference disabled, the setup is loaded with a black clip icon if the clip is not found.


