


Changing the View Mode
You can view clip libraries in either Single, or Dual View mode. The libraries' contents can be viewed in Proxies, Titles, or List View mode. Switch modes by selecting a view from the View Mode box or by pressing P (Proxies), T (Titles), or L (List View).
Use Titles mode to view all the entries in a clip library by name.
In Titles mode, entries are presented as a series of horizontal bars.


(a) Collapse arrow (b) Name Sort arrow (c) Date Sort arrow (d) Soft-import indicator (e) Name (f) Description (g) Creation Date field
The bars consist of the following arrow buttons and fields.
Expand or Collapse arrowClick the Expand or Collapse arrow to expand or collapse entries. See Expanding and Collapsing Entries in Titles and Proxies Mode.
The colour of the box surrounding the arrow indicates the type of entry. The colour of the arrow indicates whether contained entries are selected. See Entry Colours.
Name fieldContains the entry's name. If a name is not specified when an entry is saved, this field is labelled <untitled>. See Renaming Entries.
Name Sort arrowClick to alphabetically sort entries by name. See Sorting Entries in Titles and Proxies Mode.
Description fieldContains a brief description of the entry. For example, a Source Area entry is described as “Source Area - n Clips” where n is the number of clips in the Source Area entry.
Creation Date fieldProvides the date and time the entry was created.
Date Sort arrowClick to sort entries by creation date. See Sorting Entries in Titles and Proxies Mode.
Use Proxies mode to view the clips in a clip library as proxy images. Clips only appear in Proxies mode if the entry that contains them is expanded. All other entries are listed as titles.
The Proxy Size box and Information box appear.
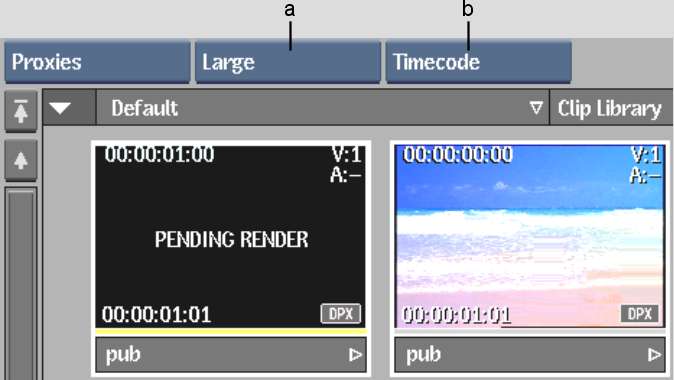
(a) Proxy Size box (b) Information box
| Select: | To: |
|---|---|
| No Display | Disable the display of information on clips. |
| TC + Res | Display current timecode, duration, clip dimensions, bit depth, and aspect ratio. |
| Frame + Res | Display current frame number, duration, clip dimensions, bit depth, and aspect ratio. |
| Timecode | Display current timecode and duration. |
| Frame | Display current frame number and duration. |
Selected information is displayed on the proxy.
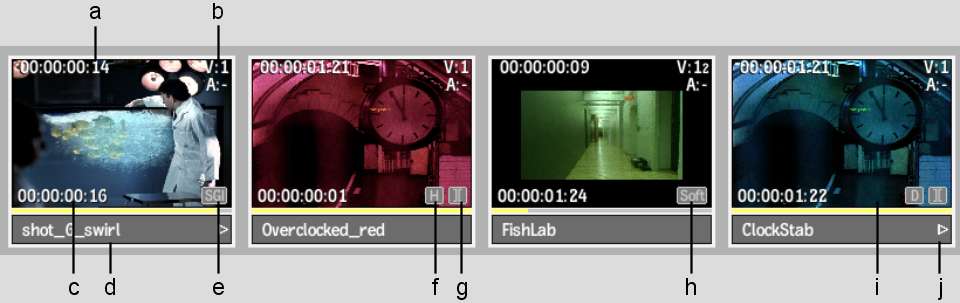
(a) Current timecode; keycode is also displayed if present (b) Number of video and audio tracks (c) Clip duration (d) Name bar (e) Soft-import indicator (for a clip that is not a hybrid) (f) Clip History indicator (g) Soft Edits indicator (h) Soft-import indicator (for a hybrid clip) (i) Deliverable indicator (j) Play button
Left image courtesy of Technicolor (formerly Toybox)
Clip History indicatorClips that have clip history have an indicator. See About Clip History.
Deliverable indicatorClips that have real-time settings have an indicator. See Managing Deliverables.
Soft-import indicatorClips that are soft-imported have an indicator. The type of indicator depends on whether the clip is a hybrid clip or a completely soft-imported clip. See Recognizing Soft-Imported Clips.
Soft Edits indicatorProxies for clips with soft edits (such as uncommitted cuts, dissolves, or splices) have a “][” symbol.
Proxies for source clips are identified by a dark grey border (proxies for regular clips have a light grey border).
In the Preferences menu, when the Show Selected Item option is selected in the Broadcast Monitor box, a monitor symbol appears on the clip.

(a) Monitor indicator (active)
Monitor indicatorClick the monitor indicator to send the clip to the broadcast monitor (the currently selected clip in the broadcast monitor displays a blue indicator).

(a) Jogging area (b) Position indicator (c) Play button
Image courtesy of Technicolor (formerly Toybox)
A yellow position indicator under the image shows the approximate position of the frame being shown.
The cursor changes to a green arrow and the clip plays from the current frame to the end.
To navigate to in and out points:
Viewing Clips in List View Mode
Use List View mode to view the clips in a clip library in a list.
List View provides most of the same functionality as Titles or Proxies mode—you can select, load, delete, and name entries. However, you cannot perform drag and drop operations, such as moving or copying entries, in List View.