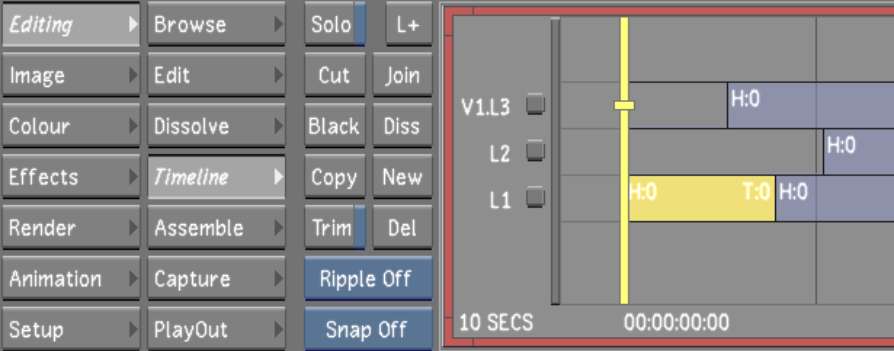
There are various areas to work with when you access the Timeline menu:
To access the Timeline menu and multi-layer timeline:
The Timeline menu and the multi-layer timeline canvas appear.


The multi-layer timeline is made up of the following components.
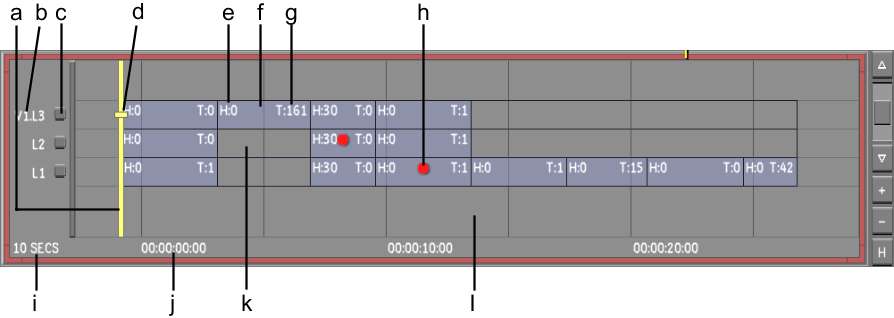
(a) Positioner (b) Layer name (c) Layer selector (d) Focus point (e) Element Head (f) Element (g) Element Tail (h) Shot Priority indicator (i) Timeline scale (j) Starting timecode (k) Gap (l) Canvas
PositionerThe play head for the Player. The frame directly beneath the positioner is displayed in the Player and is the current location for an edit. The positioner's location is reflected in the Source Timecode or Timeline Information field. See Monitoring the Location of the Current Frame.
Layer nameThe name of the layer, where V stands for Video and L for Layer. Adding a layer generates V1L2, V1L3, etc.
Layer selectorSelects the entire layer in preparation for an operation.
Focus pointWhen Solo mode is enabled, the focus point indicates the current layer and which layer is displayed in the Storyboard. When Solo mode is disabled, the top layer acts as the primary layer and is displayed in the Player and Storyboard. The focus point also determines to which layer a cut or dissolve is added. Together, the position of the focus point and the positioner is reflected in the Source Timecode or Timeline Information field. See Monitoring the Location of the Current Frame.
Element HeadNumber of available frames for trimming, succeeding a transition.
ElementThe media in the timeline.
Element TailNumber of available frames for trimming, preceding a transition.
Shot Priority indicatorGraphical representation of a shot with priority. See Shot Priority.
Timeline scaleThe scale of the timeline. Zooming in or out of the timeline allows you to view more or less detail.
GapThe absence of media. In a multi-layer context and when Solo mode is disabled, gaps are also transparent.
CanvasClick the canvas to zoom in/out and move the timeline.
For the hotkeys to these functions, see Hotkeys.
The Timeline menu is made up of the following buttons.
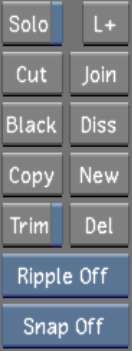
SoloWhen Solo mode is enabled, Lustre displays, plays out to tape, or renders only the layer on which the focus point is positioned.
CutAdds a splice at the positioner location on the focused layer.
BlackGenerates one second of black media that can be added to the timeline.
CopyCopies the current selected elements to the clip board. Copied elements are displayed in red. Drag and drop the copied elements to the destination timecode or layer.
TrimTrims the head and/or tail of an element.
Ripple modeDetermines whether the length of the edit sequence is affected when new material is inserted into or removed from the timeline.
Snap mode Affects how elements are placed when gesturally moved or copied to the Timeline.
L+Adds a new layer above the current layer(s).
JoinRemoves the splice on selected elements coming from the same source clip with consecutive source timecode.
DissAdds a dissolve at the positioner location on the focused layer.
NewCopies the current element to the next available top layer with grade data.
DelDeletes the current selection.


