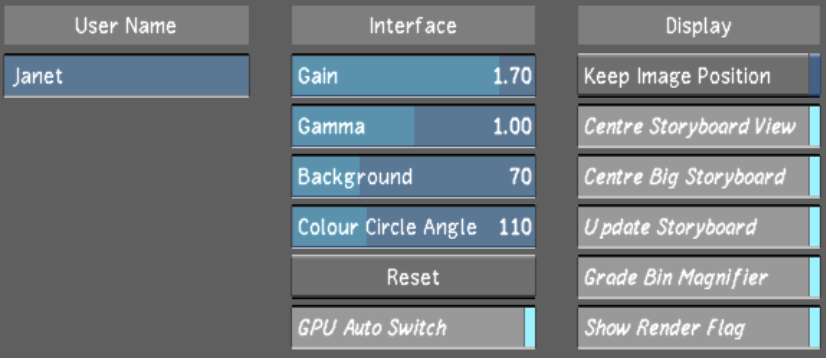
Use the Display & Interface Settings page to configure the default display and interface settings for this user.


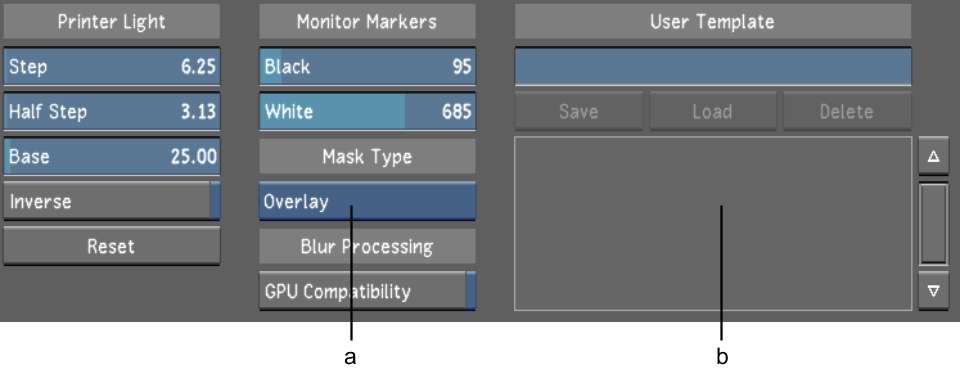
(a) Mask Type option box (b) User Template list
User Name field Enter your user name in this field. This name appears in the list of users after the user profile is saved.
Gain slider Use to adjust the white point value in the user interface.
Gamma slider Use to increase or decrease the gamma setting in the user interface.
Background slider Use to increase or decrease the background grey settings in the user interface.
Colour Circle Angle slider Use to increase or decrease the colour circle angle of the grading colour wheels.
Reset button (Interface group) Use to revert the gain, gamma, background, and colour circle angle back to their default settings.
GPU Auto Switch button Enable to allow Lustre to automatically switch to CPU processing for all features that are not GPU compatible.
Keep Image Position button Enable to maintain the image position in the display when you access the Player. When disabled, the image centres itself in the Player when you hide the user interface.
Centre Storyboard View button Enable to centre the selected shot in the Storyboard.
Centre Big Storyboard button Enable to centre the selected shot when you are viewing the Storyboard in the large Storyboard view.
Update Storyboard button Enable to automatically update the Storyboard thumbnails whenever you make changes to your shot.
Grade Bin Magnifier button Enable to magnify the thumbnail in the Grade bin when the mouse cursor is over a storage container.
Show Render Flag button Enable to display the render flag in the upper-left corner of the screen.
Step slider Use to set the value for one lab light.
Half Step slider Use to Change the value for half a lab light.
Base slider Sets the default value for your printer light settings (i.e., red, green, blue (RGB) values).
Inverse button Enable this button in the Printer Light group to invert the printer light density mode.
Reset button (Printer Light group) Click to revert the step, half step, base, and inverse settings to their default value.
Black slider Defines the values of the lines set in the histogram and waveform monitor for black.
White slider Defines the values of the lines set in the histrogram and waveform monitor for white.
Mask Type option box Toggle button to set the default mode for the F11 hotkey and the M button in the View Mode panel. See Setting Image View Options. For example, if the Mask Type is set to Overlay, when you press F11 once, you will see the matte in Secondary view; when you press F11 again, you will see the matte in Matte view, and vice versa.
| Select: | To display mattes: |
|---|---|
| Greyscale | In Greyscale mode (black and white template) by default. This Mask Type is referred to as Matte view. |
| Overlay | In Overlay mode. The matte is displayed in its original colour and the unselected region of the matte is overlayed with a uniform colour. This Mask Type is referred to as Secondary view. |
GPU Compatibility button Key blurs and geometry blurs are processed differently depending on whether CPU processing or GPU acceleration is enabled. To ensure that they are always displayed identically, enable the GPU Compatibility button before you start work on keys, key blurs, and geometry blurs.
User Template field Enter the name for the template you are creating. See Working with Templates.
Save button Click this button to save the user settings to the template named in the User Template field.
Load button Loads the user template selected in the User Template list.
Delete button Deletes the user template you have selected in the User Template list after you select a template in the Template name list.
User Template list Displays a list of all the user templates which have been created for Lustre. Select user template from this list before loading or deleting the selected template.


