The
Edge menu provides controls to:
- Create a greyscale image composed of
the edges in an image. You can apply edge-detection to both colour
and monochrome clips.
- Modify the edges of the key. You can
apply the Erode, Shrink, and Blur filters to the edges of the matte.
You can add the Edge
node to any part of the pipeline except the Front pipe of the CBlend
node. The Edge node is not appropriate for this pipe because its
result is a matte.
Using Field Mode
Video clips with fast-moving
objects can contain artifacts characterized by edge misalignments. These
artifacts occur when the odd and even fields are combined into frames. Applying
Erode, Blur, or Shrink effects to images containing misalignments does
not produce good results. To solve this problem, use Field mode.
In Field mode, frames are separated into fields and the effects
are applied to the individual fields. The fields are then recombined
into frames. This is all done “behind the scenes”—that
is, fields are not displayed in the image window.
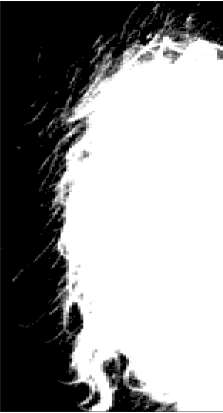
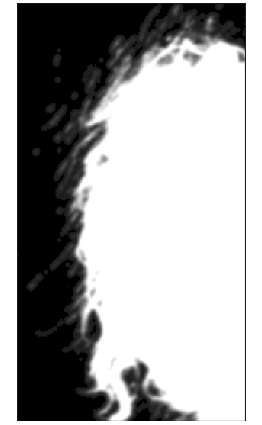
There are four matte
controls in the Edge menu you can use to enhance the edges of the
key—Edges, Shrink, Erode, and Blur.
These controls are processed
sequentially: Edges is processed first, then Shrink, Erode, and
lastly, Blur.
| Use: |
To: |
| Edges |
Create an image composed of the edges in an image. The
resulting greyscale image may be used as a matte or to produce special
effects. You can apply the Edges tool to a colour or monochrome
clip. This tool has many applications; among the most useful are:
- To delimit a portion of the matte to
perform colour corrections on the front clip.
- To create special effects by using it
directly on the front or back clip.
|
| Shrink |
Remove pixels from the edge of the matte. It should not
be used when the object in the front clip has soft edges such as
hair. A negative value expands the matte.
|
| Erode |
Blend the light and dark edges of the matte. |
| Blur |
Apply a softening Gaussian blur filter to the edge of
the matte.
|
To transform an image into edges:
- Select CurResult view from the View box.
- Enable Edges.
- Set a value for the edge-detection sensitivity
in the Width field to the right of the Edge button. This control
affects how the edge-detection algorithm determines whether or not
each pixel forms part of the edge.
- Set the Minimum Input Level in the Min
field.
The Minimum Input Level
sets the start of the range of luminance values in the image. Pixels
with luminance values below the Minimum Input Level are mapped to
black (0).
- Set the Maximum Input Level in the Max
field.
The Maximum Input Level
sets the end of the range of luminance values in the image. Pixels
with luminance values greater than the Maximum Input Level are mapped
to white (255 in 8-bit mode and 4095 in 12-bit mode).
- Enable Shrink.
- Set the width of the edge using the Shrink
Width field. Enter a negative Shrink value to expand the border,
and therefore widen the edge. Enter a positive Shrink value to decrease
the width of the edge.
To shrink the edge of the matte:
- Select CurResult view from the View box.
- Enable Shrink.
- Set a value in the Width field next to
the Shrink button.
This value specifies
the width of the border, in number of pixels, that is removed from
the edge of the matte.
To erode the edge of the matte:
- Select CurResult view from the View box.
- Enable Erode.
- Set a value in the Erode Width field.
This value specifies
the width of the matte border, in number of pixels, that will be
softened.
To blur the edge of the matte:
- Select CurResult view from the View box.
- Enable Blur.
- If you want the image to be equally blurred
horizontally and vertically, click P to enable a proportional blur.
- Set the width and height of the blur.
When P is enabled, enter a value in either field. The higher the
number, the greater the blur.