You
can save a project, clip library, Desktop, reel, soft clip, or
clip to the selected archive.
To save entries from the Desktop:
- Open the archive. See
Opening an Archive.
- Enable Include Audio if you want audio
data to be archived with the clips.
NoteIf you disable Include
Audio when archiving, the audio track information and the audio
data of the master clips are not archived. The audio of the source
clips found in the Clip History is archived. To archive without
any audio, you must delete the sources and the intermediates. See
Deleting Sources and Intermediates.
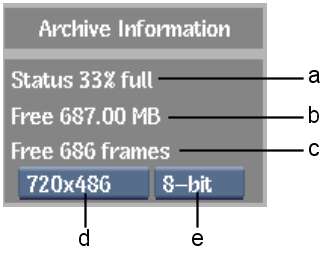
- The Archive Information displays the
percentage of space used on the medium and how much space is available
for archiving, in both MB and frames.
If needed, change the
resolution and/or frame depth to see how many frames of the specified
dimensions can be archived.
NoteWhen archiving to
a VTR, you can only archive clips of the resolution supported by
the VTR, therefore the Resolution box is greyed out and displays
the resolution of the currently selected VTR. Also, you can only archive
24-bit clips to a VTR.
- Click Save in the Archive menu.
- Select an option from the Entry Type
box that appears.
| Select: |
To: |
| Project + Shared |
Save the Desktop, all clip libraries, and imported media
to the archive.
|
| Project |
Save the Desktop and all clip libraries to the archive. |
| Clip Library |
Save the current clip library to the archive. Before
selecting this entry, make sure that you select the appropriate
clip library using the Clip Library box in the Archive menu.
|
| Desktop |
Save the Desktop to the archive. |
| Reel |
Save a work reel to the archive. |
| Clip |
Save a clip or soft edit to the archive. |
- Select the clip or reel to be saved,
or click Save:
- If you are saving a project, clip library,
or Desktop, a Save button automatically appears. Click Save to save
the project, clip library, or Desktop. Click elsewhere to cancel.
- If you are saving a reel, select a clip
on the reel that you want to save.
- If you are saving a clip, select the
clip that you want to save.
The keyboard appears.
- If the entry that you are saving already
has a name, the name appears in the Keyboard field. Otherwise, use
the keyboard to enter a name for the entry.
- Press Enter.
The project, clip library, Desktop,
reel, or clip is archived under the specified name. If necessary,
the name of the clip, reel, or Desktop is changed on the Desktop.
NoteFlint checks
for space availability on the selected medium before beginning the
archive. If there is insufficient space, an error message appears
and the process is terminated.
A time estimate appears
once Flint starts saving to the archive (for tape and VTR archives,
the time estimate appears after the tape is rewound).
- Repeat the procedure from step 4 for
any other entries you want to save to the archive.
- When you are finished, close the archive.
See
Closing an Archive.