


Listing Clip Information
List View mode displays entries in the clip library as a list of clips. The list gives information about each clip, such as start and end timecode and keycode, clip duration, archive flag, and tape name.
The following information is provided in List View.
| Column: | Displays: |
|---|---|
| Sel | The order in which clips were selected. |
| Soft-import | Soft-import indicator if the media was soft-imported. |
| D | Deliverable indicator for clips with real-time settings. |
| H | History indicator for clips containing history. |
| Location | Path of the parent entries in which the clip is located. |
| Clip Name | Name of the clip. |
| TC In | Start record timecode of the clip, or in point of the clip if one has been set. If Frame is selected in the Information box, the equivalent frame number is displayed. |
| TC Out | End record timecode of the clip, or out point of the clip if one has been set. If Frame is selected in the Information box, the equivalent frame number is displayed. |
| Duration | Duration of the clip, or the duration between in and out points, if they have been set, in timecode or frames. |
| Frames | Number of frames referenced by a clip. |
| KC In | Start keycode for the clip, or for the in point of the clip if one has been set. |
| KC Out | End keycode for the clip, or for the out point of the clip if one has been set. |
| Tape | Name of the associated tape. <N/A> indicates that the tape cannot be renamed. See Renaming a Clip's Tape in List View and Editing an EDL. |
| V | Number of video tracks. |
| A | Number of audio tracks. |
| Width | Pixel width. |
| Height | Pixel height. |
| Bts | Bit depth. |
| SM (Scan Mode) | Whether the clip is field 1 or 2 dominant or is progressive. |
| P (Proxies) | Whether a proxy exists for the clip. |
| U (Unlinked) | Whether the media associated with the clip — video (V), audio (A), video and audio (V/A), or high-resolution media (HR) — has been unlinked. |
| E | Number of editing elements of the clip. |
| Created | Creation date and time of the clip. |
| Archived | Date the last time the clip was saved to an archive tape. |
| Comment | Comment for the selected clip. |
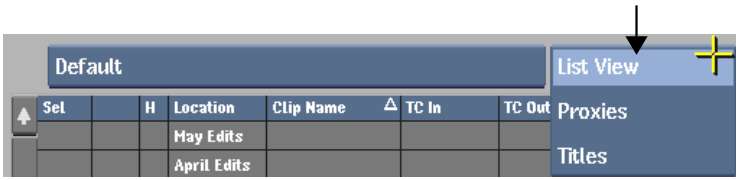
When you select List View, the Information box appears. Use this box to display the clip length in frames or timecode. To display frames, select either Frame, Frame + Res, or No Display. To display timecode, select Timecode or Timecode + Res.


(a) Information box
In List View, you can sort on any field. Simply click the label of any field to sort by that field. The sort field is highlighted and contains a sort arrow at the right end of the label.
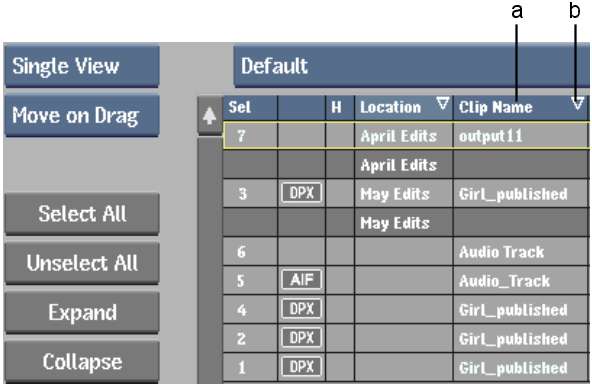
(a) Clip field (b) Sort arrow
The sort can be either in ascending or descending order. The arrow points down for an ascending alphanumeric sort and up for a descending sort. To toggle between ascending and descending sort, click the field label a second time.
When you perform a sort on any field other than the Clip field, you automatically get a secondary sort on the Clip field. This means that you can sort by one field—the primary sort—and get a sort of the clip names within the other field—the secondary sort. For example, if you sort by the Location field, you get a secondary sort by the clip name. Clips would then be sorted within their parent entries. Any field can act as a primary sort field, but only the Clip field can be the secondary sort field.
A sort arrow appears on both the fields. The last field you clicked is highlighted, indicating this is the primary sort field.
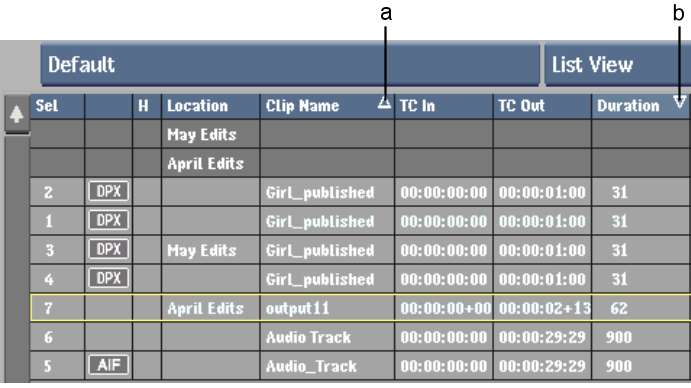
(a) Primary sort on Clip Name field (b) Secondary sort on Created field
List View is useful if you have clips with long clip names because you can resize any column to display more or less information. Place the cursor between any two columns in the column name area to display the column resize cursor. Drag the cursor to resize the column.
Renaming a Clip's Tape in List View
You can name or rename the tape of a captured clip or a source clip (such as a clip rendered in Backdraft Conform) in List View. This is useful when a manually captured clip has been given the wrong tape name.
You cannot rename the tape for a clip in the clip library if <n/a> appears in the Tape column. The structure of the clip must resemble that of a captured clip so that it can be associated with the EDL. Use the following guidelines to determine whether you can assign the tape name to a particular clip.
Video clip with no audioThe clip can be a captured clip or a pure source clip (a clip rendered in Backdraft Conform). Virtual source clips (for example, an uncommitted colour clip created with the Colour Source tool or a multitrack containing a virtual source) cannot be assigned a tape name.
Video clip with audioThe start and end timecode of the audio and video must be the same. The video tracks must have the same source timecode and the same tape name. Also, if the video or audio has been rendered/mixed down, the clip cannot be assigned a tape name. However, if both video and audio have been rendered/mixed down, the clip can be assigned a tape name.
To name or rename the tape for one or more clips:
The on-screen keyboard appears; the Keyboard field contains the existing tape name.
The name is applied to all selected clips. If there are clips in the selection that do not conform to the requirements for renaming the tape, they are not renamed. A message informs you of how many clips were renamed.
You can add a comment to a clip, for example, to remind you that the clip is part of a particular project.