The Assembly Options menu contains options that you can set that affect EDL assembly.


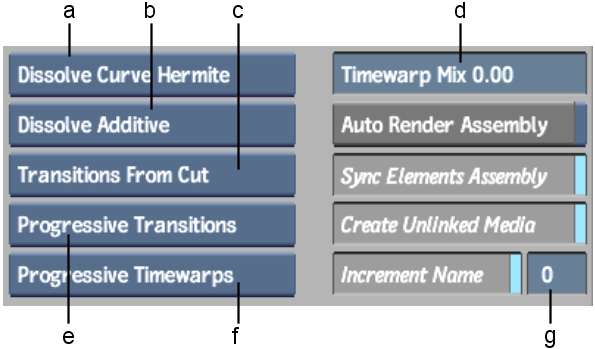
(a) Dissolve Curves box (b) Dissolve Type box (c) Transitions Alignment box (d) Timewarp Mix field (e) Transition Render Option box (f) Timewarp Render Option box (g) Increment field
Dissolve Curves boxSelect the type of interpolation to use for all dissolves.
| Select: | To: |
|---|---|
| Dissolve Curves as in Prefs | Use the interpolation mode set in the Preferences menu. |
| Dissolve Curves Linear | Create dissolves with linear interpolation curves. |
| Dissolve Curves Hermite | Create dissolves with hermite interpolation curves. |
Dissolve Type boxSelect a rendering option for dissolves during EDL assembly.
| Select: | To: |
|---|---|
| Dissolve Additive | Render dissolves as additive. |
| Dissolve Non Additive | Render dissolves as non additive. |
| Dissolve Inv Non Additive | Render dissolves as inverse non additive. |
Transitions Alignment boxSelect an option for the placement of transitions in assembled EDLs.
| Select: | To: |
|---|---|
| Transitions From Cut | Align transitions after the cut. |
| Transitions Centred | Centre transitions on the cut. |
| Transitions Up To Cut | Align transitions before the cut. |
Transition Render Option boxSelect the rendering mode for transitions in assembled EDLs.
| Select: | To: |
|---|---|
| Interlaced Transitions | Override the Preferences settings and render transitions in Interlaced mode. |
| Progressive Transitions | Override the Preferences settings and render transitions in Progressive mode. |
| Render Trans. as in Prefs | Use the Preferences settings. |
Timewarp Render Option boxSelect an option for the rendering mode for timewarps in assembled EDL.
| Select: | To: |
|---|---|
| Progressive Timewarps | Override the Preferences settings and render timewarps in Progressive mode. |
| Interlaced TW, No Interp | Override the Preferences settings and render timewarps in Interlaced mode with no interpolation. |
| Interlaced TW, Half Interp | Override the Preferences settings and render timewarps in Interlaced mode with half interpolation. |
| Interlaced TW, Full Interp | Override the Preferences settings and render timewarps in Interlaced mode with full interpolation. |
| Render TW as in Prefs | Use the Preferences settings. |
Timewarp Mix fieldEnter the mix value for assembled timewarps. You can enter any value from 0.00 to 1000.00.
Auto Render Assembly buttonEnable to render transitions and timewarps when you assemble the final clip.
Sync Elements Assembly buttonEnable to automatically create Edit Sync groups for video and audio tracks that share the same timecode. See Creating Edit Sync Groups for Multiple Video Tracks.
Create Unlinked Media buttonEnable to assemble an EDL, even if you do not have all the sources and, later, use the Recapture/Relink media feature to bring the missing media into your work-in-progress timeline clip.
When you disable this option, you get virtual sources with no indication of source timecode and tape name for the events when no recapture media exists for an event.
Increment Name buttonEnable to increment the assembled clip name (when assembling the same clip multiple times).
Increment fieldEnter a number by which the name is incremented. Active only when the Increment Name button is enabled.
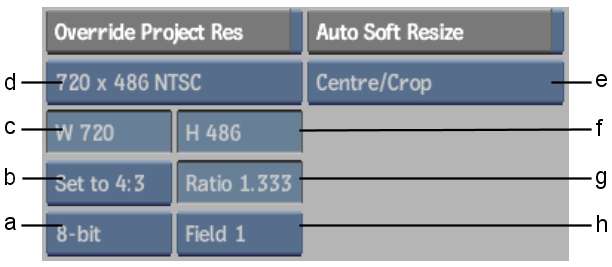
(a) Frame Depth box (b) Aspect Ratio Presets box (c) Frame Width field (d) Resolution Presets box (e) Fit Method box (f) Frame Height field (g) Aspect Ratio field (h) Scan Mode box
Override Project Resolution buttonEnable to assemble pre-captured material of a different resolution than your project's default resolution. Additional controls become active that you use to specify the resolution options for assembly.
During assembly, the system searches the specified library reel for matching media. For media to match an event during EDL assembly, all the specified parameters must be the same (including frame rate, resolution, bit depth, and so on). When a match occurs for an event, the event is marked as captured.
By default, Override Project Resolution is disabled and the project's default resolution is used when matching EDL events to pre-captured media.
Resolution Presets boxSelect one of many standard resolutions, as well as a Custom option that you can use to specify non-standard resolutions.
Auto Soft Resize buttonEnable to apply a soft resize when assembling any clip that was captured at a resolution that differs from the native project resolution. Options become active that allow you to specify how the soft resize should be applied.
Fit Method boxSelect a fit method option to be applied to the imported clip.
| Select: | To: |
|---|---|
| Centre/Crop | Fit the source image, centred, over the destination frame. If the source is larger than the destination, it is cropped. If the source is smaller than the destination, it is surrounded by a black border. |
| Crop Edges | Fit one edge of the source into the destination frame without stretching or squashing the frame. Excess parts of the source frame after resizing are cropped. If the source—after the one edge is resized—is wider than the destination, its overhanging left and right edges are cropped. If the source is taller than the destination, the upper and lower edges are cropped. |
| Fill | Fit the source, width and height, into the destination frame. If the source and destination frames do not have the same aspect ratio, the image can become distorted. |
| Letterbox | Fit the source to the destination frame without squashing or stretching it, and without cropping the source. If the source is wider than the destination, black bars fill the top and bottom of the destination frame. If the source is narrower than the destination, black bars fill the right and left sides of the frame. In all cases, the entire source frame is contained within the destination frame. |
Frame Width fieldDisplays the frame width of the selected resolution preset. If Resolution Presets is set to Custom then this field is active, allowing you to enter the frame width value that you want to use.
Aspect Ratio Presets boxSelect a standard frame aspect ratio. Select the Set to w:h option to set the clip to use square pixels. Select Custom to define a custom frame aspect ratio in the Aspect Ratio field.
Frame Depth boxSelect from one of five frame depth options: 8-bit, 10-bit, 12-bit, 12-bit u, or 16-bit fp.
Frame Height fieldDisplays the frame height of the selected resolution preset. If Resolution Presets is set to Custom then this field is active, allowing you to enter the frame height value that you want to use.
Aspect Ratio field Displays the aspect ratio of the imported clip. When Aspect Ratio Presets is set to Custom, this field becomes active so that you can enter a custom frame aspect ratio.
Scan Mode boxSelect an option to determine the order in which the fields of interlaced material are scanned.
| Select: | To: |
|---|---|
| Progressive | Scan a frame-based clip with no interlacing. |
| Field 1 | Scan Field 1 first, followed by Field 2. |
| Field 2 | Scan Field 2 first, followed by Field 1. |


