Controlling the VTR


When working with a VTR, you can use the VTR transport controls to play through the video tape and locate your footage. As you find your footage, you can capture it immediately, or add shots to a list that you can batch digitize all at once.

You can also use the transport controls to cue up a VTR to the record in point when playing out to the VTR.

Show small imageShow large image

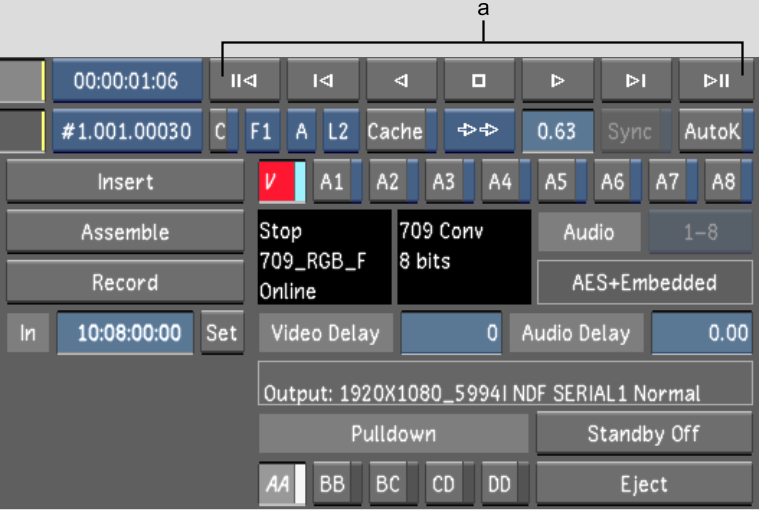
(a) VTR transport controls  

NoteTo control the VTR remotely, you must connect a 9-pin RS-422 cable between the VTR and Lustre. For information, refer to the Autodesk Lustre Software Installation Guide for your platform.

To control the VTR:

  1. Do one of the following:
    • If performing capture operations in the Capture menu, click the Source Timecode field. The capture controls turn blue to indicate that you can use them as VTR transport controls.
    • If performing playout operations in the Playout menu, click the Source Timecode field. The playback controls turn blue to indicate that you can use them as VTR transport controls.
      NoteIn the Playout menu, you can toggle between the timeline and VTR by clicking on the Source Timecode field. If the Source Timecode field is blue, the controls can be used as VTR transport controls. If the controls are white, they are timeline controls.

    Show small imageShow large image

    (a) Source Timecode field  

    The transport controls are as follows.

    Click: To:
    Fast rewind.
    Cue to TC In. Right-click to jog back one frame.
    Play in reverse.
    Stop the VTR.
    Play forward.
    Cue to TC Out. Right-click to jog ahead one frame.
    Fast forward.
  2. To eject the tape in the VTR, click Eject in the Capture menu.
NoteYou can also control the VTR from the Playout menu. See Playing Out to a VTR.