Chapter 8, Playing, Viewing and Sorting Shots
| Panning and Zooming the Image | Navigating through Shots | ||
Chapter 8, Playing, Viewing and Sorting Shots |
|||
 Setting the Active Field for Display in the Player
Displaying Colour Menus in the Player
Lustre has several view options. As you work on a grade, you can:
Display various versions of the image (for example, before or after secondary colour grading).
Toggle between full resolution and proxy resolution.
Display a specific channel of the image.
Switch between fields when working with interlaced footage.
Switch between viewing LUTs.
Display colour menus in the Player alongside the image.
For control surface mappings, see the section that addresses customizing the view in Appendix A, The Autodesk Control Surface, or in Appendix B, The Tangent CP100 Control Surface.

Use the View Mode buttons to view different versions of the image as you work on your grade.
Click one of the View Mode buttons.

 "Show full-size image")
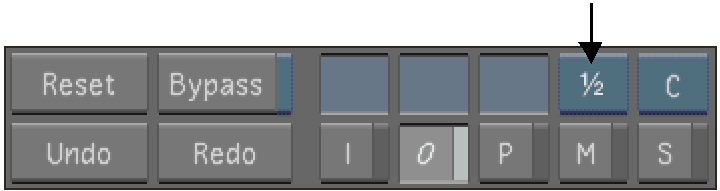
| Click: | Or press: | To view: |
| I | I | The image with colour corrections made in the Grading and Curves menus only. Note: You cannot select this mode if no corrections have been made in the Secondaries menu. |
| O | O | The output image, which contains the result of all corrections applied. This is the default viewing mode. |
| P | P | The printed, or rendered image. See Chapter 18, Rendering. If the frame has not been rendered, a red X appears in the image window. Note: If you rendered a shot and still see a red X in the image window, press Shift+P to force Lustre to re-detect all rendered files. |
| M | F11 | The current selection for a secondary correction. See Creating a Secondary by Keying a Range of Colours. |
| S | L | The stored reference image. See Viewing Reference Images. |
The image changes to the selected view mode.
While working, you can display the full-resolution version of shots or half-resolution proxies in both the Player and full-screen Player. Displaying proxies speeds up interaction and playback on shots with many effects added to them. Half-resolution proxies are also useful for playing to projectors and for saving disk space--they take up only 1/4 of the space of the original footage. For example, you can store proxies on the server and full-resolution footage on the main storage device.
You can switch between full and half resolution any time. Generating and displaying proxies does not affect your original footage in any way. The resolution is independent of the grade file data.
To display proxies, you must first generate them. See Generating and Viewing Proxies.
In any menu, click the Full/Half Resolution button or press F9.
 "Show full-size image")
The resolution toggles between full and half (proxy) resolution. An ungenerated proxy appears as a red X with a black background.
Note: Buttons for switching between full and half resolution are also found in the Grade and Render menus.
You can display all colour channels of an image, or individual channels in grayscale. The grayscale versions of colour channels represent in values of gray the amount of that colour channel found in each part of the image. The darker the gray, the greater the amount of colour present.
Click the Colour Mode button one or more times.

 "Show full-size image")
The button cycles through the different channels and the image is updated.
| Button Label | Channel Displayed |
| C | Colour (all channels) |
| R | Red |
| G | Green |
| B | Blue |
| L | Luminance |
Interlaced video formats divide frames into two line-based fields. One field consists of the first and subsequent odd lines in the frame, and the other field consists of the second and subsequent even lines in the frame. During the recording process, the images that make up each field are recorded at slightly different moments. For example, when recording NTSC, field 1 is recorded 1/60th of a second before field 2.
While in Output view mode, Lustre can only display one field at a time. The field that is displayed is the active field. When you render the footage, both fields are processed.
Note: Setting the active field affects preview display only and does not impact the final output. Rendering is performed according to field dominance grade settings selected during project creation.
Toggle the F1/F2 button.
This switches the view in the Player between field 1 and field 2.

 "Show full-size image")
Use the LUT button to display the image using one of three Print LUTs selected for viewing purposes. See Selecting Print LUTs.
Click the LUT button one or more times.

 "Show full-size image")
The button label changes to L1, L2 or L3, indicating the currently loaded LUT.
You can display the Colour menus in the Player next to the image in the currently active playhead. This allows you to:
Keep the Colour menus available even if you are accessing another menu.
Display viewing options such as split-screen view on the second head of the graphics card.
Use the mouse cursor to access the HDSDI head and draw shapes that will appear on the broadcast monitor.
For details on assigning shots to playheads, see Viewing Reference Images.
Press F7.
The Colour menus appear alongside the image, and are disabled in the main user interface.

 "Show full-size image")
| Image courtesy of Moviworld / UK File & TV Company / Videolab |