X-Rite materials are derived from data
scanned from real paint samples with an X-Rite MA98 spectrophotometer.
They can be applied to objects in the scene like any other material
(with the exception of Decals), and can have some basic parameters
adjusted.
To create new X-Rite
measured materials, you must be running the Professional version of
Showcase, and you must have the X-Rite MA98 and its associated plug-in.
Color accuracy and monitor
calibration
The measured materials
displayed in Showcase are only visually accurate if the display system
is calibrated. Perceived colors can shift when moving from one display
to another, particularly when using a laptop or an external monitor
or projector. In order to achieve good on-screen color and a definite
relationship to the scanned material, it is necessary to use a monitor
calibration device such as the X-Rite i1 Display 2 or the X-Rite
Color Munki. This should always be the first step, even if the shader
is being used for design purposes.
Enabling the plug-in
The X-Rite material presets
can be used at any time, but to create new measured materials from
the X-Rite device, the plug-in for the X-Rite MA98 must be installed
into the Showcase user folder.
The X-Rite plug-in can
be used to adjust parameters on both the base and Professional versions
of Showcase. However, measured materials can only be created on
Showcase Professional.
To install the plug-in
- Copy the file “XRiteCustom.py” from the Program Files\Autodesk\Showcase2011\extras\Interactive\ folder
to the user folder at My
Documents\Autodesk Showcase 2011\.
- Restart Showcase.
The UI for editing advanced material properties
and connecting to the USB X-Rite device will be enabled.
NoteThis plug-in will
remain enabled as long as either the original “XRiteCustom.py” or
the compiled “XRiteCustom.pyo” files are in the current user Showcase folder.
Acquiring a measurement
To build a color from
a measurement in Showcase, follows these steps after the plug-in
is enabled.
This can only be done with
Autodesk Showcase Professional.
- Make sure the X-Rite MA98 drivers are
installed and the device is connected and powered on.
- Copy an existing X-Rite material into
the scene (either applied to an object, or right-click on the library
material icon and select Copy to Scene Materials.
- Open the material properties with Ctrl-M
if an object with the material is selected, or right-click on the
material icon and select Properties.
- Click the Reset
device connection button.
- Measure the physical material with the
X-Rite MA98 device.
- Click the Apply
measurement button.
NoteBe sure to duplicate this material if additional
measurements are needed for comparison or study. Each application
of the measured data will overwrite the previous, without undo.
- Rename and Save your material to your
custom library. For more information, see
Work with the Materials interface
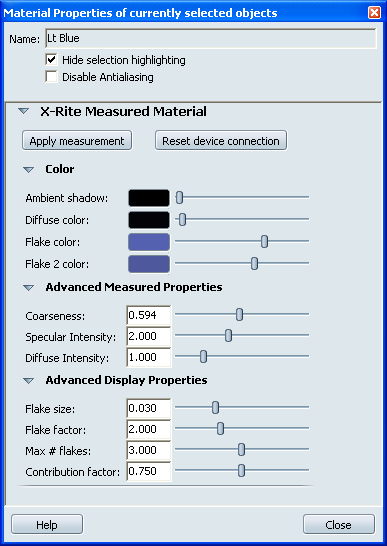
X-Rite Material Properties
NoteEditing the material
properties should only be done when the measured material is a starting
point for a more artistic interpretation. All of these values will
be automatically defined by the spectrophotometer readings of the
actual material when the plug-in is enabled.
- Apply measurement (requires plug-in)
-
Once a connection to
the X-Rite MA98 has been established, and a measurement taken with
the device, press this button to transfer the data from the scanner
to the material in Showcase.
NoteThis button should
not be pressed if no X-Rite MA98 is connected to the computer, or
is not powered on.
- Reset device connection (requires plug-in)
-
Use this button to re-establish
a connection to the device if it has been lost or if an error occurred.
NoteThis button should
not be pressed if no X-Rite MA98 is connected to the computer, or
is not powered on.
Color properties
- Ambient Shadow
-
Filters the color and
brightness of any Ambient Shadows on the object that the material
is applied to. (Black = default black ambient shading, White = no ambient
shading visible, Color = colored ambient shadows on top of the current
material) For details on how to create and control Ambient Shadows,
see
Add ambient shadows to surfaces
- Diffuse color
-
Sets the base color
for the materials. For details on how to use the Color controls,
see
Change colors.
- Flake color
-
The Flake color is a
differential color that represents the flake that is nearest to
the surface of the material and is influenced by the light color.
Small modifications of this color can produce very different results.
- Flake 2 color
-
The Flake 2 color is
a differential color that represents the flake that is deeper in
the material, and is therefore predominantly influenced by the pigment
or flake effect.
Advanced Measured Properties
- Coarseness
-
Regulates the influence
of the flake on the material. Realistic values for this parameter
go from 0.3 to 0.8. Car paints without flake should not use this
material type, as even a value of 0.0 will show a flake.
- Specular Intensity
-
The Specular Intensity
controls the absolute influence of the Flake Color on the material.
This is an artistic parameter and is set to 2 by default.
- Diffuse Intensity
-
The Diffuse Intensity
controls the absolute influence of Flake 2 Color on the material.
This is an artistic parameter and is set to 1 by default.
Advanced Display Properties
- Flake size (requires plug-in)
-
The Flake Size describes
the apparent size of the flake relative to the material. This is
in the same units as the material since the specification of the
flake is done in object space (as opposed to texture space.) Decreasing this
parameter results in smoother surface coloration but will potentially
decrease the performance of the shader. Setting this parameter
to the correct size is important particularly when rendering close-ups
of the material.
- Flake factor (requires plug-in)
-
The Flake Factor
describes the density of the flakes in the material. Since it is
very closely related to the Flake Size in terms of its effects,
modifications to this parameter also can affect performance and
the perception of flakes in close-ups of the material. In general,
it is recommended to leave this parameter at its default value of
4.
- Max # flakes (requires plug-in)
-
The Maximum Number of
Flakes is a performance parameter designed to limit the flake sub-sampling
that is performed. The effect of this is squared so a setting 7 requires
roughly 5 times more computations than a setting of 3. The particular
setting will depend on the number of triangles using this material,
the number of triangles in the scene, and the capabilities of the particular
video card that is being used
- Contribution factor
-
The Contribution Factor
roughly corresponds to the flake orientation distribution. Artistically,
it modifies the spread of the flake highlight around specular.
Considerations and limitations
- Paints: X-Rite
materials and measurements are only appropriate for metallic flake paints,
rather than flat paints or other types of paints.
- Scene lights: The
X-Rite measured material does not show lighting or shading from scene
Lights. The only illumination it receives is from the environment
IBL.
- Anti-aliasing: The
X-Rite measured material has the best visual appearance when anti-aliasing
is enabled (from Performance and Quality in
the menu).
For performance reasons, it's recommended that this be enabled on
idle processing instead of forcing a minimum setting. Ray tracing
at higher samples per pixel creates its own anti-aliasing.
- Anti-aliasing: At
this time, it is required that the MA98 measuring device be "tethered"
to your computer. Removing the USB cord will not automatically disconnect
the device, but you may be required to choose Reset
device connection again when reconnecting
the device. Once a connection is reestablished, a measurement can
then be taken.
- Illuminant/ Observer: Currently,
the Illuminant/Observer pair is fixed at D65, 10 degree