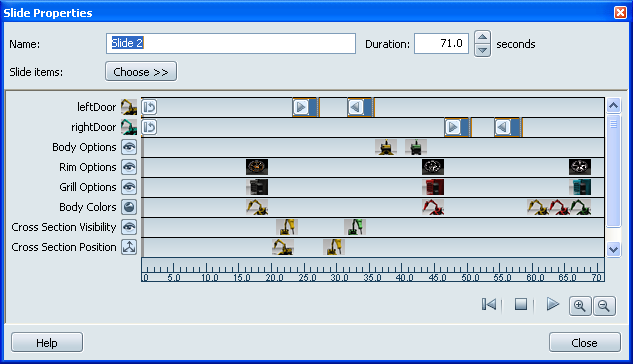
The Slide Properties dialog box is a graphical representation of the elements of a slide, such as shots and alternatives, in chronological order. It enables you to arrange elements sequentially and position them so they help you tell a story about your design. You can add multiple elements of the same type, such as alternatives from the same lineup.
Read the following sections to find out more.

Tip: You can also double-click a slide (in authoring mode) to open the properties dialog box.
On the left side of the dialog box are the types of elements present in your slide, such as lineups, shots, and so on. On the bottom is the time grid of the slide.
At the core of the dialog box is a series of rows, each of which contains occurrences of element types in relation to the time grid. Each element appears as a swatch.
Navigate and select items in the Slide Properties dialog box
To zoom in and out of the Slide Properties dialog box:

To pan right and left inside the properties dialog box
To display the name of an element:
To select multiple items in the properties dialog box:
You can make the following changes in the Slide Properties dialog box. For details on guidelines to follow for each type of element, see What you can and cannot do in the Slide Properties dialog box.
To add a new element to the dialog box:

To display the time at which the element appears in slide sequence:

To move an item to a different position on the time grid:
Tip: For duration items such as animations, you can also click the right edge of the item and define a new end time.
To move a multiple selection to a different position on the time grid:

Tip: Drag the left- or right-most arrow to resize the selection. This affects the duration of the group of elements; the durations of the individual elements within the selection remain the same.
To delete an element from the dialog box:
What you can and cannot do in the Slide Properties dialog box
This topic describes what you can and cannot do with all scene elements from the Slide Properties dialog box.
When you add an alternative to a slide, a row is created for that alternative’s lineup. Multiple alternatives added from that lineup appear in the same row, and are placed immediately after the last alternative in the row.

You can add many different alternatives, but only one instance of each.
You can add multiple behaviors, including keyframe animations and turntables. Each is represented by its own row in the Slide Properties dialog box.

You cannot add triggers to the Slide Properties dialog box.
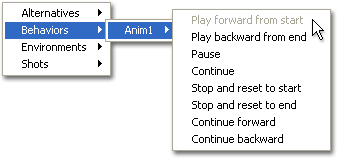
You cannot add an action for a behavior more than once; for example, if you add “Play forward from start” for Turntable1, you cannot add this action again for that turntable in the current slide. All other actions can still be added and are available from the Choose menu.
Only one environment can be added to a slide, and it is always loaded at the start of the slide, for the duration of the slide.


