Imported
FBX Animations are behaviors that apply complex keyframed animation
to objects in the scene. The FBX animation itself is created in
a separate application and imported into the scene with the behavior.
FBX Animation behaviors can be controlled individually, linked to
each other, and added to Storyboard slides to create a compelling presentation.
NoteSave a copy of your
scene before creating or editing Imported FBX Animation behaviors.
The complex object transformations in FBX animations are applied
to objects outside of the normal Transformation Properties and the
undo list.
If you pause an FBX animation
and delete the behavior, your objects will retain the animation
transformations but cannot be reset to their original locations.
Always rewind or reset any animations before saving or transforming
objects.
Recommended FBX workflow
- Set up and optimize
the scene. Consider what objects will be animated and create appropriate
groups of multiple objects.
- Create alternatives and storyboard slides.
Some objects to be animated
may be part of alternatives, and animations can be triggered from
Storyboard slides.
- Select the objects to be animated by
a single behavior.
- Choose Select > Isolate Selected to
hide all other objects in the scene.
- Select File > Export as FBX... to
send the currently visible objects to an animation package for 3D
reference. For more information, see
Export As....
- Import the FBX into 3D animation software
as reference geometry.
NoteThe options available
for FBX import will vary based on the animation application used.
Autodesk Maya and Autodesk 3DStudio Max have robust and complete FBX
support and are recommended for this work.
- In the animation software, animate the
imported reference geometry with node-based, rigid animation.
NoteSimple keyframed
transformations such as translate, rotate, and scale are supported,
as well as baked animations derived from Inverse Kinematics, Dynamics,
or other node-based animation methods.
Per-vertex and deformation
animations are not supported.
- In the animation software, preview and
test the animation using the imported reference geometry and a seconds-based
timeline.
NoteNot all scene animation
needs to be created and exported at the same time. Multiple animation
behaviors can be created and each behavior will have its own playback
controls, but behaviors can be linked to play concurrently or added
to slides to create complex presentations.
- Export Animation Only.
- Z-up World Coordinate
Axis.
- Bake Complex Animations (if not already
baked)
The export dialog box and supported features
for FBX export will vary between animation packages. The FBX export
dialog box for Maya 2008 is similar to the following:
Import the FBX Animation
- Press B to show
the Behaviors interface.
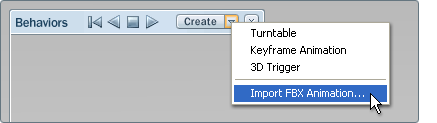
- Click the arrow beside the Create button
and select Import FBX Animation.
- A file browser window opens. Browse to
and select the FBX file to use for the animation data.
NoteIt is easiest to
apply the FBX animation to the same geometry exported earlier via
FBX. This will insure that the node names and structure match. If
they match, the animation will automatically be applied.
When the FBX animation
file is loaded, the Animation Properties window will open.
- If you maintained the same hierarchy
and names in your scene and imported FBX animation, a HUD message
will appear stating “Existing nodes were mapped to the created animation
behavior and some empty items were added to the scene. Press ‘O’ to view
them in the Organizer.”
- The animation is automatically applied
to matching nodes and can be previewed using the animation controls
in the Behavior Properties window.
Set animation properties
- Double-click over the name field of the new behavior
and type in its name. Or, double-click on the icon for the animation
behavior to rename it later.
This will help you identify
the animation if you create several animations.
- Set the Play Mode to play Once and
stop, to Loop over and over, or to Oscillate back and
forth.
Play back the FBX animation
- In
the Animation Properties window, click the Playback Controls button.
Or, right-click the icon
for the animation behavior in the Behaviors interface, and choose
Animation Controls from the menu.
- This will open the Animation Controls
window.
NoteThe title of the
window will be the same as the behavior name. Multiple behaviors
can be played at the same time from multiple open Animation Control
windows.
- Press the Play button
to view the animation in the scene. Adjust the playback speed by
pressing the “+” and “-” buttons to
the right of the timeline scrub bar.
For details on all of
the controls in the Playback Controls window, see
Play the turntable animation
Add FBX Animations to Storyboards
Animations can be added
to Storyboard slides and triggered with different playback options
when the slide is played. See
Add behaviors to a slide for
more information. To learn more about Storyboards, see
Set up a storyboard.