Show in Contents

Add to Favorites

Home: Autodesk Mudbox Online Help

Export a paint layer

Paint using layers

Change the opacity of a paint layer

Create and edit paint layers
using Photoshop
Paint
layers can be exported from Mudbox as Adobe® Photoshop® files (.psd file format). The .psd format
files can either be edited or used as reference layers within Photoshop,
saved, and subsequently re-imported to update the original paint
layers within Mudbox.
This feature reduces
the number of steps required to work between Mudbox and Photoshop
by sharing files in a more seamless manner, and takes advantage
of the powerful features within each application. The two workflows possible
are:
- Export an existing paint layer from the
paint layer editor with an extra layer that contains an image of
the UV layout so you can create and edit your paint textures using
the UV layout as a reference. For more information, see
Export a paint layer with UV layout.
- Export an image of your model as it appears
in the 3D View so you can create new
paint textures or edit existing ones using the tools within Photoshop
using your 3D model view as a reference. For more information, see
Export a paint layer of the 3D View.
Export a paint layer with
UV layout
- (Working within Mudbox) In
the Layers window, ensure the display
button is set to Paint.
- Select the paint layer you want to export.
- From the Layers window
menu (
 ), select Export
Selected. (Right -clicking the paint layer also displays
the same menu).
), select Export
Selected. (Right -clicking the paint layer also displays
the same menu).
The Save
As window appears.
- Select a directory, enter a filename,
and then set the image format file type to: Photoshop
{8bit, RGBA} (.psd) before clicking Save.
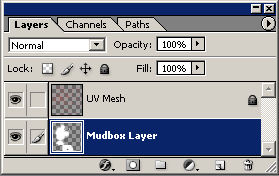
Exporting a paint layer
as a .psd format file from the paint layer window creates a file
containing two layers:
- Mudbox Layer -
The paint layer you selected for export
- UV Mesh - A
layer that includes an image of the UV texture coordinates (based
on how they appeared on the base subdivision level for the model) that
is aligned with the paint layer you selected. The UV layer is intended to
be used as a reference for your texture creation and editing work
in Photoshop.
- (Working within Photoshop) Open
the .psd file containing the paint layer you saved in Mudbox.
The Layers window in
Photoshop (Hotkey: F7) displays the paint layers you exported from
Mudbox with the UV Mesh layer above the paint layer in the list.
You can keep the UV Mesh layer displayed or turn it off as required.
NoteWhen editing the
file in Photoshop, do not change the Layer blend mode setting. Only
the Normal blend mode setting is supported when the .psd file is
subsequently re-imported into Mudbox.
- Perform any paint work or edits as required
on the Mudbox Texture layer using
the tools within Photoshop.
- After completing your texture creation/editing
work in Photoshop, save the file by selecting File
> Save. Ensure that the paint you created or edited is
on the bottom layer of the Photoshop layer editor.
NoteWhen you re-import
the .psd file into Mudbox, it reads only the bottom layer of the
Photoshop file. That is, it ignores the UV Mesh layer and any other
layers above the bottom layer. If you have created other paint layers
in the file you should merge them down to the bottom layer for the
version of the file you want imported to Mudbox. Otherwise, these
additional layers are ignored.
- (Working within Mudbox) If
you have not saved your Mudbox scene since exporting the paint layer,
the connection between the paint layer and the exported .psd file
will still exist. Right-click the paint layer in the Layers window
within Mudbox and select Refresh Selected to
update the original paint layer with your Photoshop edits. Otherwise,
right-click the layer and select Import Layer.
Export a paint layer of
the 3D View
- (Working within Mudbox) Set
up your model in the 3D View as you would like it
to appear on the paint layer in your Photoshop file. That is, dolly, track
or tumble the view as required.
- In the Paint Layers window,
select the diffuse paint layer you want to be exported with the
image of the 3D View. Temporarily hide any
diffuse layers that are not required by clicking the visibility
button.
NoteDiffuse paint layers
are the only layer type available for export and re-import using
this workflow.
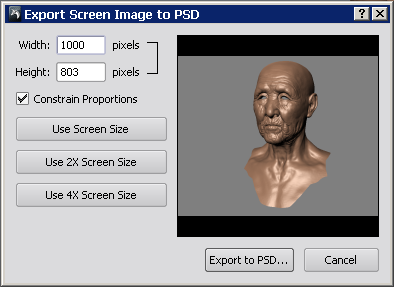
- Export an image of the screen by selecting File
> Export Screen to PSD...
The Export
Screen to PSD... window appears.
- To save an image of the current 3D
View, click Use Screen Size,
otherwise, click either the Use 2X Screen Size or Use
4X Screen Size buttons if a larger resolution is desired,
or specify a custom Width and Height for
the image (in pixels), and then select Export to PSD...
NoteIf you enter custom Width and Height values,
ensure that the resulting image aspect ratio matches the screen
resolution exactly. Otherwise, the texture may not align correctly
with the model when it’s re-imported. Using an exact integer multiple
of the current screen size is recommended.
- In the file browser window that appears,
set the directory path, enter a filename, then click Save.
NoteWhen you save the
PSD image, Mudbox automatically launches Photoshop and opens the
image in the canvas view. This will not occur if Photoshop is not
installed on your computer or the file association between the .psd
file format type and the Photoshop application has not been set.
For more information, see
Troubleshoot paint layers.
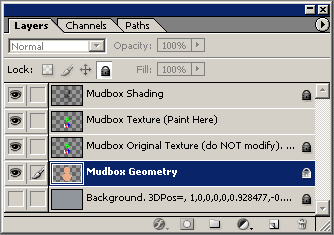
Exporting a paint layer
as a .psd format file using the Export Screen to PSD feature
saves an image of the 3D View.
This is a useful method if you want to create or edit textures using
a view of your 3D model as a reference. The .psd file that is created
using this method contains five layers (listed in order from bottom
to top):
- Background (Locked) -
A layer containing an image of the background and camera information
for the 3D View. The numerical string
listed after the layer name records camera position information
to set 3D View back to its exact location
when you re-import the PSD file after editing in Photoshop. This
layer is locked by default and should not be modified.
NoteEditing the numerical
string after the layer name or the image on the background layer
will result in the texture not aligning correctly when the PSD file
is re-imported to Mudbox. You should not resize the 3D
View in Mudbox between the time of export and re-import.
- Mudbox Geometry (Locked) -
This layer contains a screen capture of your model(s) as it appeared
within the 3D View. It displays a non-shaded
repview (flat shaded) of the model with the assigned shading material.
This layer is used to accurately composite any paint edits you make
when the file is re-imported to Mudbox. This layer is locked by
default and should not be modified.
- Mudbox Original Texture
(Locked) - This layer contains a copy of the original
paint layer(s) as it appeared from the camera’s viewpoint at the
time of screen capture. This layer is used to make a comparison
between the original paint layers and any edits you might make on
the Mudbox Texture layer. This
layer is locked by default and should not be modified.
- Mudbox Texture -
This is the layer you paint on or apply any paint edits that you
want to applied to your model after re-saving the .psd file and
re-importing to Mudbox. Do not change the layer name for this layer
as it will result in the import being aborted when re-importing
to Mudbox.
- Mudbox Shading (Locked) -
This layer contains a screen capture of the 3D shading of your model(s)
as it appeared within the 3D View.
This layer is used to accurately composite any paint edits you make
when the file is re-imported to Mudbox. It’s useful to keep this
layer visible for reference purposes when painting your textures
in Photoshop. This layer is locked by default and should not be
modified.
- (Working within Photoshop) Ensure
the .psd file containing the 3D View screen
capture image you exported from Mudbox is open in Photoshop.
In Photoshop, the Layers
window (Hotkey: F7) displays the five paint layers you exported
from Mudbox (described above).
NoteMudbox materials
containing high specular values or reflection maps are not displayed
within Photoshop exactly as they appear within Mudbox. This does
not affect your paint layer work and will appear correct again in Mudbox
when you reimport the file.
- Perform any paint work or edits as required
on the Mudbox Texture layer using
the tools within Photoshop.
NoteWhen editing the
file in Photoshop, do not change the Layer blend mode
setting nor any of the original layer names. Only the Normal blend mode
setting is supported when the .psd file is subsequently re-imported
into Mudbox. Changing the layer names will result in Mudbox not
aligning the camera correctly, or determining the correct paint
layer to apply as a stencil.
- After completing your texture creation/editing
work in Photoshop, save the file by selecting File
> Save. Ensure that the paint you’ve created is on the Stencil layer.
NoteIf you have created
any other paint layers in the file you should merge them into the Mudbox
Texture layer for the version of the file you want imported
to Mudbox.
- (Working within Mudbox) With
the original model loaded in the 3D View, and
the original paint layer selected, re-import the file you edited
within Photoshop by selecting File > Reimport from
PSD...
NoteIt’s important that
you have the original paint layer selected before re-importing so
the paint edits you made in photoshop are applied to the correct
layer.
The Reimport
from PSD... window appears.
- Select the file you saved in Photoshop
and click Open.
Importing the PSD file
causes the following to occur
NoteThe reimport feature
makes use of the stencil tool. If you have a stencil currently selected,
it is replaced with the imported texture. When the reimport and
auto-projection are successful, the stencil remains hidden. If the auto-projection
does not occur as expected, or you receive an error message stating
a problem within the PSD file the stencil may be displayed in the
3D View. It can also be manually displayed by pressing the Q key.
In these situations, refer to the
Troubleshoot paint layers topic
for possible solutions.
- Save your work.
NoteIf this feature is
not working as expected, please consult the release notes for known
limitations at the time of release at
Painting.