In the next steps, you create a 3D fluid object that emits from the surface of the geo_slag polygon object.
To create the 3D fluid container
 .
.
The Create 3D Container Options window opens.
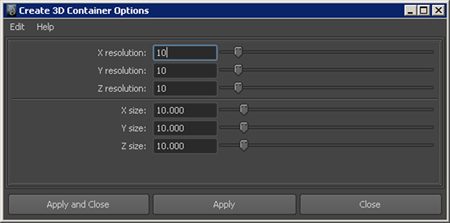
Keeping the fluid resolution values set to the default value of 10 ensures that the fluid simulates quickly. Later in the lesson, you increase the resolution values to improve the quality and overall appearance of the effect.

The Translate values position the fluid container at the top of the slag chute. You can now add the emitter to the fluid container.
To emit fluid from the slag mesh
from the main menu bar. 
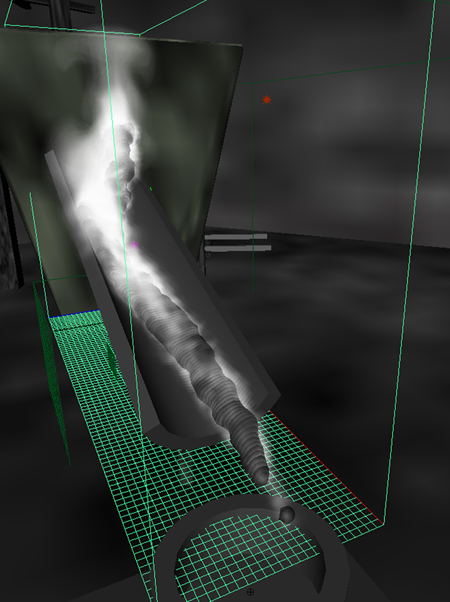
Notice that the fluid emits from the slag mesh, but only while the slag passes through the fluid container. Turning on Auto Resize enables the fluid container to follow the slag mesh as it emits fluid.


Notice that the fluid container now resizes and follows the movements of the slag. When Auto Resize is on, the boundaries (Size and Resolution) of a fluid container dynamically resize as the fluid density increases or decreases. Auto Resize keeps the fluid container relatively small, so it works well with fluid effects that move quickly, such as a missile vapor trail or the rolling smoke of an explosion.
Turning on Auto Resize can increase simulation speed, reduce memory use, creating smaller fluid cache files, and decrease fluid render time.

Notice that the fluid does not look or behave like smoke and flames. To improve the effect you will do the following:
In this section of the lesson, you set attributes to control how the fluid contents emit into the container. For this effect, you emit Density and Heat into the container. You also add Turbulence, to add swirling motion to the fluid.
For more information about fluid effects, see the Fluid Effects section in the Maya Help.
If you do not have the fluid selected, you access the fluid emitter object through the Outliner by expanding geo_slag and selecting emitter_slag_smoke1.
These values define the minimum and maximum distance that fluid is emitted from the mesh surface.
This adds turbulence to the Density and Heat as they emit into the container, which generates additional movement in the fluid.

Notice that the fluid emission is less dense, but there is little motion in the fluid. In the next section, you set fluidShape node attributes to add detail and movement to the smoke.
Next, you will adjust the Buoyancy and Dissipation attributes to define the behavior of the Density and Heat in the fluid container after emission.
To set the fluidShape node attributes
This determines the tendency of the Density to rise in the container, similar to the way a lighter-than-air gas rises in the atmosphere. Decreasing Buoyancy will keep the fluid from rising and increasing in size.
This determines how quickly Density is removed from the container similar to evaporation. Increasing Dissipation causes the Density to dissipate quicker into the air.

Setting these attributes adds movement to the Heat in the container, but they do not affect Density.

The fluid appears more subtle in the scene, but it is difficult to see how the Density and Temperature attribute adjustments have affected its behavior. Before setting the fluid Shading attributes to color the fluid, you can increase the fluid resolution to make the fluid's behavior easier to see. Be aware that increasing fluid resolution increased simulation time.


The fluid behavior is now much easier to assess.
 Except where otherwise noted, this work is licensed under a Creative Commons Attribution-NonCommercial-ShareAlike 3.0 Unported License


