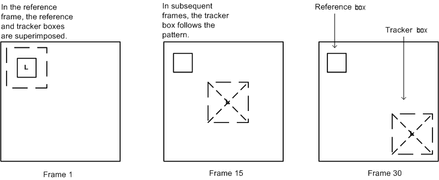
To start stabilizing, select one or more reference points on your clip. Locate the first frame containing the movement to be tracked (the reference frame). In general, the reference frame is the first frame of the sequence. The choice of reference point depends on whether you are tracking or stabilizing. When tracking, the reference point is a feature you want to track; when stabilizing, the reference point represents the point around which the image is stabilized—see Choosing a Reference Point. Place the reference box(es) around the selected feature(s).
Once you have set the tracker positions, start the tracking process, also referred to as analyzing the footage. During the analysis, the tracker box associated with each tracker moves as the Stabilizer looks for a pattern that matches the reference in each frame of the clip.
The Stabilizer calculates the difference between the position of the tracker box and the position of the reference box to produce X and Y Shift values. Shift values are a measurement (in pixels and subpixels) of how much the reference point has moved.

When the analysis is complete, you can fine-tune it if a tracker box has strayed from the reference it was supposed to follow. Once you are satisfied with the results, you can apply the data to the footage.
To track, the Stabilizer applies the Shift values as is. To stabilize, the Stabilizer inverts the X and Y Shift values in each frame of the sequence, and moves the image according to these values. This gives the impression that the reference point stays in the same position throughout the sequence. Because the image is moved during stabilization, a border appears on one or more edges, which means that some pixels are lost. The following illustrations show the process.


