The UV
Texture Editor lets you view and interactively edit the
UV texture coordinates for polygon and subdivision surface types.
UVs appear laid flat within the UV Texture Editor’s 2D view. It
also lets you display the 2D image for the texture map in relation
to the UVs. These features are critical for accurate and efficient
placement of texture maps on polygon and subdivision surface types.
In this lesson, your
goal is to ensure that the shape and placement of the UVs match
the image as it appears in the 2D view of the UV
Texture Editor. This will ensure that the map appears
correctly on the cracker box model in the 3D scene view.
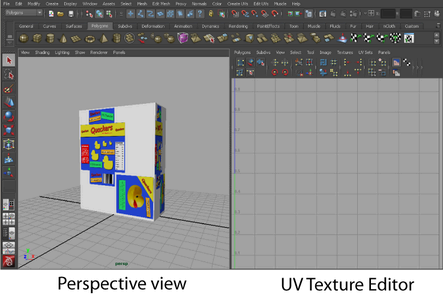
To open the UV Texture Editor in
a two pane layout
- In the scene view, right-click any of
the Quick Layout buttons on the Toolbox to
display the pop-up menu of Quick Layout shortcuts
and select Persp/UV Texture Editor from the
list.
The panel layouts update
to display the Perspective view in the left
pane and the UV Texture Editor in the right
pane simultaneously. (You can close the Attribute Editor if
it is still displayed.)
This two pane layout
is helpful for two reasons:
- The two view layout shows you how one
item selected in the 3D view relates to the UVs displayed in the
2D view of the UV Texture Editor and vice
versa, without having to open and close the views repeatedly.
- When you edit UVs for a surface mesh
in the UV Texture Editor, you can immediately
see the effect of the texture map on the model in the 3D scene view.
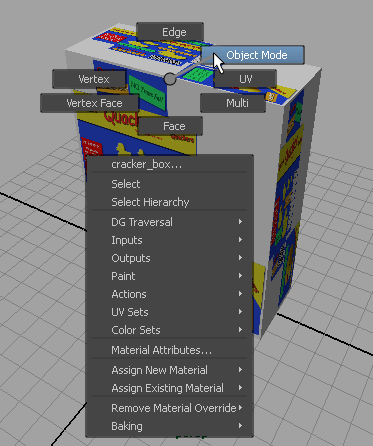
UVs do not initially
appear in the 2D view of the UV Texture Editor until
you select an object or change the selection mode for an object
in the scene view.
To
view UVs in the UV Texture Editor
- In the scene view, right-click any region
of the cracker box model and select Object Mode from
the pop-up menu.
- Select the cracker box model.
- In the UV Texture Editor,
dolly the view outwards so you can see the UVs for the cracker box
as shown below. (To dolly, press the Alt key and drag the mouse
to the left while holding down the right button on your mouse.)
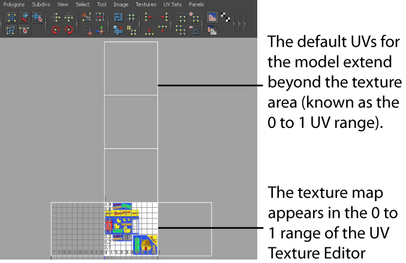
The UV texture coordinates
for the cracker box model appear in the 2D view of the UV
Texture Editor as a flattened, two-dimensional representation.
The UVs appear highlighted with lines connecting the UVs to indicate
the region of the texture the UVs represent.
The image you specified as the texture map for
the box also appears in the 2D view of the UV
Texture Editor in the upper right quadrant of the 2D cartesian
graph called the UV image range or UV
Texture Space. The coordinates for this quadrant range
from 0,0 to 1,1 and represent the texture space for the surface.
How the UVs appear in this quadrant in relation to the displayed
image has a direct bearing on how the texture gets mapped onto the
surface.
TipIf the texture map
for the cracker box doesn’t appear in the 2D view, select Image
> Update PSD Networks in the UV
Texture Editor to refresh the 2D view of the UV
Texture Editor. Update PSD Network is normally used to
refresh a PSD texture in Maya after you have modified the PSD texture
in Adobe® Photoshop®.
In this example, the
UVs for the cracker box appear like a box where all six sides have
been cut open and then unfolded flat.
The texture map does
not appear correctly on the cracker box for a number of reasons:
- The UVs for the cracker box extend well beyond
the default 0 to 1 UV range for the texture map in the 2D view of
the UV Texture Editor. As the texture
map displays within the 0 to 1 range, the UVs should also be positioned
to fit within the 0 to 1 UV range, in most cases. Otherwise, the
texture map repeats on the surface mesh, as it does in this case.
- The position of the UVs do not match
the specific regions of the image we’ve provided for the texture
map. The regions of the image show the front, back, top, bottom,
and sides of the box. The UVs should specifically match these regions
to display the texture correctly. UVs do not automatically align
themselves to a texture, you must manually reposition them.
- The shape of the UVs don’t match the
aspect ratio of the cracker box model in the scene view: -10 (Height)
X 8 (Width) X 3 (Depth). This is because the default UVs for a Maya
cube primitive are created based on a predetermined default shape
and do not get updated if the shape or scale of the primitive is
modified later on.
There are a number of
things you can do to correct these issues depending on the situation.
For this lesson, you will correct the UV and texture map misalignment
by doing the following:
- Map a new set of UVs for the cracker
box model that better matches the individual faces of the cracker
box. (While the existing UVs could be modified, you’ll learn how
to create new UVs in this lesson that will better match the size
and scale of the 3D model.
- Ensure the new UVs fit within the 0 to
1 UV range in the UV Texture Editor.
- Reposition the UVs so that they correlate
to specific locations on the 2D image using the UV
Texture Editor. This will ensure that the various sides of
the box receive the correct regions of the texture map.