


Prepare a polygonal surface for conversion to
a subdivision surface
A common way to start a subdivision surface is to create a simple “rough sketch” of the shape with polygons and convert that to the base mesh of a subdivision surface. Keep the following in mind when you create a polygon mesh.
When you are ready to convert a polygon mesh to a subdivision surface, see Convert a NURBS or polygonal surface to a subdivision surface.
Start with as few faces as possible
A dense subdivision base mesh wastes control points and will reduce performance.
If you want to convert an existing mesh, try using Mesh > Reduce to reduce the number of faces in the mesh.
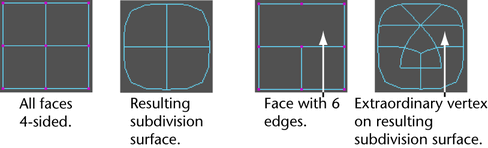
Use mostly 4-sided polygons (quads)
While subdivision surfaces can handle up to 256 sided polygons, you will get best results from using mostly 4-sided polygons.
When modeling subdivision surfaces, try to avoid faces with more or less than 4 sides, and vertices with more or less than 4 adjacent faces.
When a face or patch on the original surface is not 4-sided, an extraordinary vertex (a vertex with less than or more than 4 adjacent faces) is created at level 0 of the subdivision surface. This affects the parameterization of the subdivision surface and might make the surface bumpy (the bigger the quads relative to the model, the less this is a problem).
Put vertices and edges in the polygon mesh where you want them in the subdivision surface
If you can plan out where you want vertices and edges in the model, it will help you produce the results you want when modeling and binding the surface to joints.
For example, edges must be present where you want to create a partial or full crease, and as with polygonal and NURBS surfaces, edges should circle the eyes and mouth on the model of a head.
Watch out for polygons that will not convert
You cannot create subdivision surfaces from the following types of polygonal surfaces.
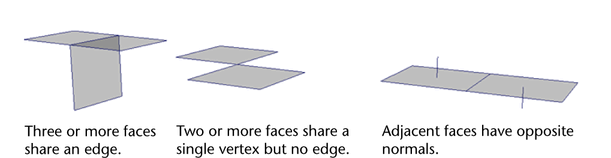
Use Mesh > Cleanup to correct nonmanifold geometry.
Use Mesh > Cleanup to correct lamina geometry.
One way to correct inconsistent normals is to use Normals > Conform.